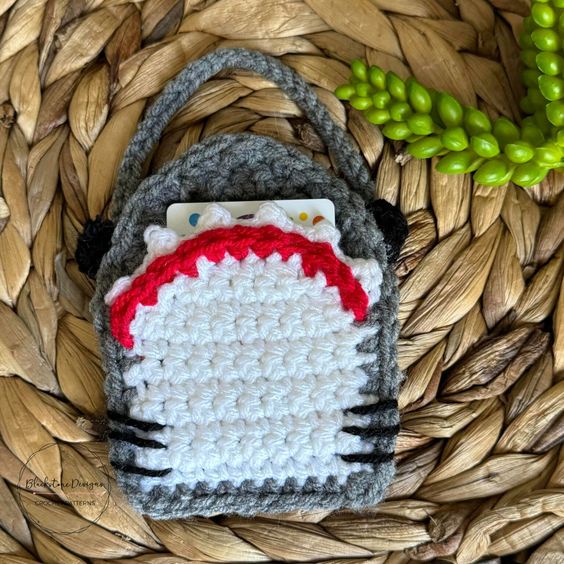
Crochet Shark Gift Card Holder
The Crochet Shark Gift Card Holder is a fun and unique way to present gifts to your loved ones. With its adorable shark design and practicality, you can add a whimsical touch to any gift-giving occasion. This handmade crochet holder not only keeps the gift card safe but also adds a personal touch that shows you put thought into their present. The charming shark design is sure to bring a smile to anyone's face and makes for a great conversation starter. Whether for a special occasion or just a spontaneous gesture, this gift card holder is a delightful way to make your presents stand out.
Materials
Worsted Weight Yarn (#4)
- Gray [50yds]
- White [10yds]
- Red/Pink [10 yds]
- Black [10 yds]
H/8/5.00mm Hook
Hot Glue Gun / Sticks
Yarn Needle
Scissors
Gauge
Gauge is not critical for this project
Finished Measurement
3.75” x 4.75” approximately
Stitch Guide
arnd = around
ch = chain
sc = single crochet
sk = skip
sl st(s) = slip stitch(es)
st(s) = stitch(es)
Skill level
Easy
Written in U.S. Terms
- Beginning chains do not count as stitches.
- Where asterisks appear, repeat the instructions between them.
- Tutorial photos are at the end of the pattern.
Instructions
BACK PANEL (Top Jaw)
With Gray,
R1. Ch 11, sc in 2nd ch from hook and in each ch across, turn (10)
R2. Ch 1, sc across, turn (10)
R3-12. Repeat R2
R13. Ch 1, dec, sc x 6, dec, turn (8)
R14. Ch 1, dec, dc x 4, dec, turn (6)
R15. Ch 1, dec, sc x 2, dec, turn (4)
R16. Ch 1, dec x 2, Fasten. (2)
FRONT PANEL (Bottom Jaw)
With White,
R1. Ch 11, sc in 2nd ch from hook and in each ch across, turn (10)
R2. Ch 1, sc across, turn (10)
R3-8. Repeat R2
R9. Ch 1, dec, sc x 6, dec, turn (8)
R10. Ch 1, dec, dc x 4, dec, turn (6)
R11. Ch 1, dec, sc x 2, dec; Fasten. (4)
JOIN PANELS
Hold Panels together, with the front panel on top of the back panel, aligning each row.
With Gray,R12. Attach yarn to bottom right corner, working through both layers: Ch 1, sc in same space as join, sc in end of each row up the side to the corner of R8 of front panel, then working in back panel only, sc in the end of each row and in each stitch until you get to the opposite corner of R8 of front panel, then working through both layers again: sc in the end of each row down the side and in each st across the bottom; Fasten.
GUMS
With Red or Pink,
Attach yarn to corner of R8, sl st in the end of each row and in each st across to opposite corner; Fasten.
TEETH
With White,
Ch 18, sl st in 2nd ch from hook, ch 2, sl st in same space as ch, *sl st x 3, ch 2, sl st in same space as ch* across, sl st in last ch; Fasten.
EYES (Make 2)
With Black,
R1. Ch 3, sc in 2nd ch from hook and in last ch, turn (2)
R2. Ch 1, sc across, turn (2)R3. Ch 1, dec; Fasten. (1)
HANDLE
With Gray,
Ch 40; Fasten.
Finishing
- Attach teeth to backside of gums, so the first and last tooth are at the corners.
- Attach R1 of eyes to edge of back panel, over R11&12 approximately, one to each side.
- Attach the ends of the handle to the back panel edge, over approximately R8-12. The ends will attach to a bit of the eyes as well.
- Stitch gills onto front panel between R1&2, R2&3, and R3&4, approximately 1.5 sts in from edge.
- Hide all strings.