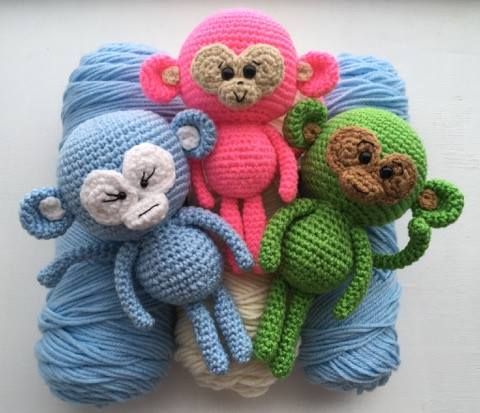
Crochet Monkey Toy
Creating a crochet monkey toy can be a delightful and rewarding experience. The process of carefully selecting the yarn colors, shaping the pieces, and stitching them together with love can result in a charming and cuddly companion. Whether you are making it for a child to play with or as a unique gift, the handmade touch adds a special warmth and personal connection. As you work on each stitch, envisioning the cute face and playful demeanor of the monkey, you can't help but smile at the thought of how much joy it will bring to its future owner. Crocheting a monkey toy is not just a craft project; it's a journey of spreading happiness one stitch at a time.
Abbreviations
ch-chain
sc-single crochet
inc-increase
dec-decrease
Supplies
Red Heart Super Saver Yarns (in a variety of colors)
2.5mm crochet hook
Safety eyes (I used a variety of different sizes)
Stuffing
Head
Rnd1: Starting at the top of your monkeys head sc x 6 in a magic ring (6)
Rnd2: Inc x 6 (12)
Rnd3: (Sc, inc) x 6 (18)
Rnd4: (Sc, inc) x 9 (27)
Rnd5: Sc x 27 (27)
Rnd6: (Sc x 2, inc) x 9 (36)
Rnd7: (Sc x 3, inc) x 9 (45)
Rnd8-10: Sc x 45 (45)
Rnd11: (Sc x 4, inc) x 9 (54)
Rnd12-14: Sc x 54 (54)
Rnd15: (Sc x 4, dec) x 9 (45)
Rnd16-17: Sc x 45 (45)
Rnd18: (Sc x 3, inc) x 11, sc (56)
Rnd19-20: Sc x 56 (56)
Rnd21: Dec x 28 (28)
Rnd22: Sc x 28 (28)
Rnd23: Dec x 14 (14)
Rnd24: Now put your head aside for now, you will come back and sew the face onto your monkey then continue to sc your head closed. Once you have created the mouth insert your safety eyes through the eye patch and the head, attach the washers, and sew the eye patches and mouth in place. Now stuff your head firmly and dec x 7 (7)
Rnd25: Dec x 3 closed, now fasten off (3)
Eye Patch (make 2)
Rnd1: Sc x 6 in an adjustable ring (6)
Rnd2: Inc x 6 (12)
Rnd3:(Sc, inc) x 6, now fasten off (18)
Mouth
Row1: Chain x 6 (6)
Row2: Turn, sc x 5 (5)
Row3: Do not turn, sc x 5 down the opposite site of your work (5)
Rnd4: Inc, sc x 3, inc, sc x 5, now fasten off (12)
Body
Rnd1: Starting at the bottom of your body sc x 6 in a magic ring (6)
Rnd2: Inc x 6 (12)
Rnd3: Inc x 12 (24)
Rnd4-5: Sc x 24 (24)
Rnd6: (Sc x 3, inc) x 6 (30)
Rnd7-8:Sc x 30 (30)
Rnd9: (Sc x 5, inc) x 5 (35)
Rnd10: Scx 35 (35)
Rnd11: (Sc x 4, dec) x 5 (30)
Rnd12-13: Sc x 30 (30)
Rnd14: Dec x 15, stuff your body (15)
Rnd15: Sc x 15, now fasten off (15)
Arm (make 2)
Rnd1: Starting at the bottom of your arm sc x 6 in a magic ring (6)
Rnd2-12: Sc x 6 (6)
Rnd13: (Inc, sc x 2) x 2 (8)
Rnd14-15: Sc x 8, fasten off at the end of Rnd15 (8)
Leg (make 2)
Rnd1: Starting at the bottom of your leg sc x 6 in a magic ring (6)
Rnd2: (Inc, sc x 2) x 2 (8)
Rnd3-11: Sc x 8 (8)
Rnd12: (Dec, sc x 2) x 2 (6)
Rnd13-19: Sc x 6, fasten off at the end of Rnd19 (6)
Ear (make 2)
Rnd1: Staring at the top of the ear sc x 6 in a magic ring (6)
Rnd2: Inc x 6 (12)
Rnd3: (Sc, inc) x 6 (18)
Rnd4-6: Sc x 18 (18)
Rnd7: Dec x 9 (9)
Rnd8: Sc x 9, now fasten off (9)
Inner Ear (make 2)
Rnd1: Sc x 6 in a magic ring, now fasten off (6)
Tail
Rnd1: Starting at the tip of your tail sc x 6 in a magic ring (6)
Rnd2-4: Sc x 6 (6)
Rnd5: Dec, sc x 4 (5)
Rnd6-23: Sc x 5 (5)
Rnd24: Sc, (inc, sc) x 2 (7)
Rnd25: Sc, (inc, sc x 2) x 2, now fasten off (9)
Assembly
Make sure your head and body are stuffed firmly, and sew your body onto the head. Sew on the ears, legs, arms and tail. Sew on a mouth and eyebrows.
No comments
Write a comment