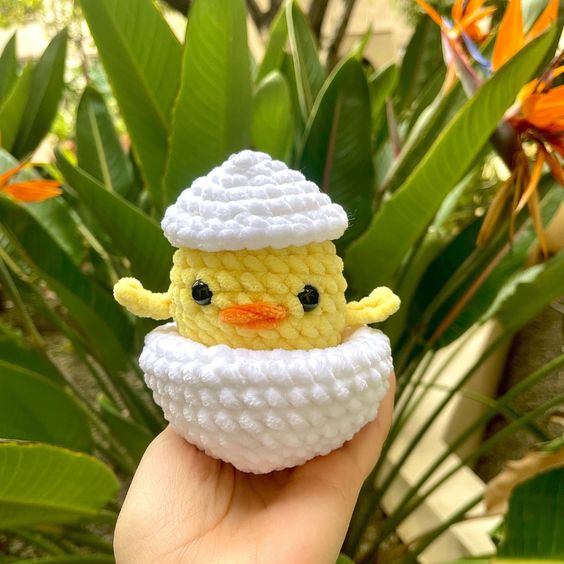
Crochet The Hatching Chick
Crochet The Hatching Chick is a delightful project perfect for bringing a touch of spring into your home. With this pattern, you can create an adorable little chick bursting out of its eggshell. The bright yellow yarn combined with the fluffy white egg makes for a charming addition to your Easter decorations. Whether you’re an experienced crocheter or new to the craft, this pattern offers clear instructions and a fun challenge. Imagine the joy on your friends' and family's faces when they see this cute chick perched on a shelf or nestled in a basket. Crochet The Hatching Chick brings warmth and cheer to any space, making it a joy to craft and share.
MATERIALS
Disclaimer: Some links may be affiliate links, meaning I earn a commission by purchasing these products at no extra cost to you. Thank you for supporting me by using my links!
- Premier “Parfait Chunky” 100% polyester super bulky weight #6 yarn (3.5oz/131yds; 110g/120m)
- Body Color: Yellow, 1 skein
- Egg Color: White, 1 skein
- Beak Color: Tangerine, about 20 inches
- US size G-7 (4.5mm) crochet hook
- Polyfill
- 10mm Safety eyes
- Stitch markers
- Scissors
- Tapestry needle
PATTERN NOTES
- This pattern is worked in continuous rounds, meaning you do not slip stitch and chain one at the end of the round. Use a stitch marker and simply continue working on the next round.
- The hook and yarn weight are completely adjustable, use whatever you enjoy!
STITCHES AND ABBREVIATIONS (US TERMS)
Hatching Chick Pattern
- ( ) — Repeat
- Ch — Chain
- Dec – Decrease
- Inc — Increase
- Sc — Single Crochet
- Slst — Slip Stitch
- St(s) — Stitch(es)
Invisible Decrease: The invisible decrease is used throughout this pattern. When the pattern calls for a decrease, you’ll complete the following:
- Insert your hook into the front loop of the following two stitches. Yarn over and pull through the first two loops. Yarn over, and pull through the remaining 2 loops on the hook.
PATTERN INSTRUCTIONS
Begin with Yellow for the main body.
Round 1 – sc 6 in a magic ring (6)
Round 2 – inc 6x (12)
Round 3 – (sc 1, inc) 6x (18)
Round 4 – (sc 2, inc) 6x (24)
Rounds 5-7 – sc 24 (3 rounds)
We will work the wings in round 8.
Round 8 – sc 6, work the first wing as follows:
- to work the wing: ch 4, starting from the second ch from the hook, slst 3, slst into the initial sc
- sc 12, work 2nd wing, sc 6 (24 + 8 slst)
While working round 9, ensure that the wings are facing outward.
Rounds 9-10 – sc 24 (2 rounds)
- Attach the safety eyes between rounds 7 and 8. The eyes should be placed 3 stitches in from the wings with 5 stitches between them.
- Sew the mouth between rounds 8 and 9, centered between the eyes. Pull the beak color through several times for a more pronounced beak. Tie both ends of the beak color in a knot inside of the body to secure the beak.
Round 11 – (sc 4, dec) 4 times(20)
Round 12 – (sc 3, dec) 4 times (16)
Round 13 – (sc 2, dec) 4 times (12)
Start stuffing the chick’s body.
Round 14 – (dec) 6 times (6)
In the last stitch of round 15, we will change to white.
- To work the color change: Insert the hook into the stitch where you are color changing. Yarn over and pull up a loop with the current color. Pull through with the new color to complete the stitch. Tie a knot to secure.
Round 15 – (inc) 6 times (12)
Round 16 will be our first round in white.
Round 16 – (sc 1, inc) 6 times (18)
Round 17 – (sc 2, inc) 6 times (24)
Round 18 – (sc 3, inc) 6 times (30)
Round 19 – (sc 4, inc) 6 times (36)
Round 20 – sc 36 (36)
Round 21 – sc 36 in the BLO (36)
Rounds 22-25 -sc 36 (4 rounds)
Round 26 – (sc 4, dec) 6x (30)
Round 27 – (sc 3, dec) 6 times (24)
Round 28 – (sc 2, dec) 6 times(18)
Round 29 – (sc 1, dec) 6 times (12)
The egg portion will not be stuffed. This will allow the chick to fold down into it!
Round 30 – dec 6 times (6)
Tie off and leave a long end for sewing. Sew the bottom shut by seaming tightly through each of the 6 remaining stitches.
OPTIONAL SHELL CAP
Using White,
Round 1 – sc 6 in a magic ring (6)
Round 2 – inc 6 times (12)
Round 3 – (sc 1, inc) 6 times (18)
Round 4 – (sc 2, inc) 6 times (24)
Round 5 – sc 24 (24)
Tie off and leave a long tail to sew the cap to the chick’s head.