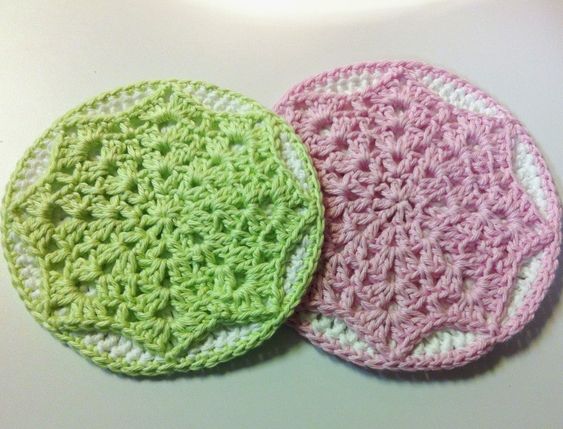
Crochet Doily Overlay Potholders
Crochet doily overlay potholders are not just handy kitchen accessories; they are also a delightful way to add a touch of charm to your home decor. These potholders combine the practicality of protecting your hands while cooking with the vintage aesthetic of crochet doilies. Their intricate designs and delicate patterns make them a lovely addition to any kitchen. Whether you are looking to spruce up your own culinary space or searching for a thoughtful housewarming gift, these potholders are sure to bring warmth and style to any kitchen. So, next time you reach for a hot pot or pan, do it in style with these adorable and functional crochet doily overlay potholders.
Yarn & Hook:
Size H hook
Worsted Cotton Yarn
Vst = 1 dc, ch 1, 1 dc into st indicated
DVst = 2 dc, ch 2, 2 dc into st indicated
Front:
Start with a Magic Ring (or ch 4 and join to first ch to form a ring)
R1: Ch 4 (counts as first dc and ch 1), (dc, ch 1) 7 more times; join to third ch of beginning ch 4. 8 dc & 8 ch-1 spaces
R2: Ch 4, dc into same st as ch 4, Vst into next dc, repeat around; join to third ch of beginning ch 4. 8 Vst
R3: Sl st over to first ch sp. Ch 3, dc in same sp, ch 2, 2 dc into same sp. (DVst in ch space of next Vst) around; join to top of first ch 3. 8 DVst
R4: Sl st over to first ch-2 sp. Ch 3, dc in same sp, ch 2, 2 dc into same sp. DC between next two DVst of previous row (not in a chain space). (DVst in ch space of next DVst, dc between DVst of previous row) around; join to top of beginning ch 3. 8 DVst & 8 dc
R5: Sl st over to first ch-2 sp. Ch 3, 2 dc in same sp, ch 3, 3 dc in same sp, dc between DVst of previous row (not in a chain space). (3 dc in next ch-2 sp, ch 3, 3 dc in same sp, dc between Dvst of previous row) around. Join to top of beginning ch 3; fasten off.
Back:
Start with a Magic Ring (or ch 4 and join to first ch to form a ring)
R1: Ch 4 (counts as first dc and ch 1), (dc, ch 1) 7 more times; join to third ch of beginning ch 4. 8 dc & 8 ch-1 spaces
R2: Ch 3, dc in same sp, (2 dc in each dc and chain sp) around; join to top of beg ch 3.
R3: Ch 3, dc in same sp, (dc in next dc, 2 dc in next dc) around; join to top of beg ch-3.
R4: Ch 3, dc in same sp, (dc in each of next two dc, 2 dc in next dc) around; join to top of beg ch-3.
R5: Ch 3, dc in same sp, (dc in each of next 7 dc, 2 dc in next dc) around; join to top of beg ch-3. (The count won’t come out exactly right on the last repeat…just stop and join when you get to the beginning ch-3.) Fasten off.
Finishing
Lay front and back pieces together, wrong sides together and right sides facing out. Using yarn color of choice, attach yarn to your hook, join front piece to back piece by putting your hook through any ch-3 space of front piece and through top st of any dc of back piece, yo and pull through a loop, yo and pull through both loops on hook (sc made through both pieces). Sc in next 8 dc of back piece only. Again, put your hook through next ch-3 space of front piece and through the top st of next dc on back piece, yo and pull through a loop, yo and pull through both loops on hook. Continue in this manner around.
My stitch counts didn’t come out exactly right (again). On the last two joins, I only did 7 sc before attaching the front to back. I was winging it with no pattern, people! You may need to make some adjustments also. Just make sure it looks even and it’ll be fine. I’m sure there’s a way to add stitches so that they come out exactly right, but I’m too lazy to do the math. Math is hard and hurts my brain! LOL.
No comments
Write a comment