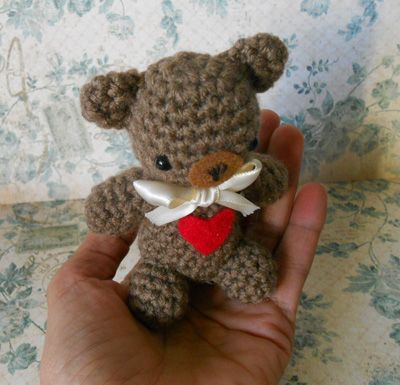
Crochet Valentine’s Day Teddy Bear
Creating a Crochet Valentine’s Day Teddy Bear can be such a heartwarming and delightful craft project! From choosing the perfect yarn color to carefully stitching each detail, the process is full of love and creativity. The soft texture of the yarn and the cute teddy bear shape are sure to bring a smile to anyone's face. Whether you're making it as a gift for a loved one or simply as a decoration to spread the love during Valentine's Day, this crochet project is bound to fill your heart with warmth and joy. So grab your crochet hook, some yarn, and get ready to craft the perfect cuddly companion to celebrate this day of love!
Materials:
– Brown yarn (I used Red Heart Super Saver – Cafe color)
– 2.75mm hook
– 6mm safety eyes, black
– Felt, red and copper brown
– Embroidery thread, brown
– Ribbon of your choice
– Fiberfill for stuffing
– Yarn needle
– Pins
– stitch marker (to mark the end of your row)
– Glue gun, or fabric glue
Abbreviations:
rnd = round
sc = single crochet
inc = increase
dec = decrease
st – stitch
PATTERN
Head:
Rnd 1: make a chain with 2 stitches, 5 sc in second stitch from chain (5)
Rnd 2: 2 sc in each st around (10)
Rnd 3: [1 sc, inc] 5 times (15)
Rnd 4: [2 sc, inc] 5 times (20)
Rnd 5 to 9 : sc in each st around (20)
– Insert the safety eyes, between row 7 and 8, about 5 st apart.
Rnd 10: [2 sc, dec] 5 times (15)
Rnd 11: [1 sc, dec] 5 times (10)
– Fasten off, and stuff firmly with fiberfill.
Body:
Rnd 1: make a chain with 2 stitches, 5 sc in second stitch from chain (5)
Rnd 2: 2 sc in each st around (10)
Rnd 3: [1 sc, inc] 5 times (15)
Rnd 4: [2 sc, inc] 5 times (20)
Rnd 5 to 7: sc in each st around (20)
Rnd 8: [2 sc, dec] 5 times (15)
Rnd 9 to 11: sc in each st around (15)
Rnd 12: [1 sc, dec] 5 times (10)
Rnd 13: sc in each st around (10)
– Fasten off, and leave a long tail for sewing. Stuff firmly with fiberfill.
Arms: (make 2)
Rnd 1: make a chain with 2 stitches, 5 sc in second stitch from chain (5)
Rnd 2: 2 sc in each st around (10)
Rnd 3: sc in each st around (10)
Rnd 4: [3 sc, dec] 2 times (8)
Rnd 5 to 6: sc in each st around (8)
Rnd 7: [2 sc, dec] 2 times (6)
– Fasten off, and leave a long tail for sewing. Stuff half way through with fiberfill.
Legs: (make 2)
Rnd 1: make a chain with 2 stitches, 5 sc in second stitch from chain (5)
Rnd 2: 2 sc in each st around (10)
Rnd 3 to 4: sc in each st around (10)
Rnd 5: [3 sc, dec] 2 times (8)
– Fasten off, and leave a long tail for sewing. Stuff firmly with fiberfill.
Ears: (make 2)
Rnd 1: make a chain with 2 stitches, 5 sc in second stitch from chain (5)
Rnd 2: [1 sc, inc] 2 times, 1 sc (7)
Rnd 3: sc in each st around (7)
– Fasten off, and leave a long tail for sewing. Do not stuff.
Assembling:
Sew the body to the head, using the remaining thread from the body. Use the stitches of both parts to embroider them together. Sew the arms to the each side of the body, and ears to top sides of the head. For more details, you can check my tutorial How to Sew Parts Together.
For the legs, make sure you do not sew them to close to the bottom, or your bear will fall backward and won’t stand on his legs. I used pins first to make sure the legs are in the right position.
Nose:
Cut an oval in a piece of copper color felt, large enough to fit between the eyes. Embroider a noise with brown embroidery thread, then glue on the face.
Heart:
Cut a heart shape in a piece of red felt, glue to the front of the body.
Tip: To make both side the same shape, cut a rectangle first, fold in two, and cut one side of the heart starting at the fold.
Cut a piece of ribbon and wrap it around the neck, make a bow.
Your little Valentine’s Day bear is done!