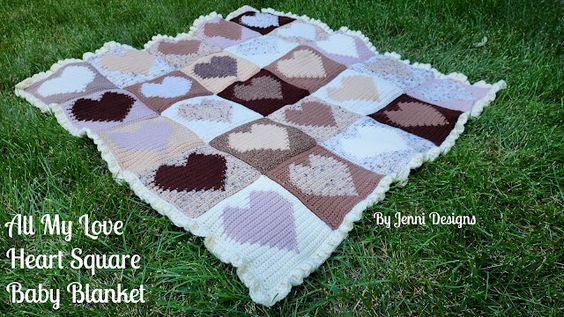
Crochet Heart Square Baby Blanket
The Crochet Heart Square Baby Blanket is an adorable and heartwarming project that's perfect for welcoming a new little bundle of joy into the world. The intricate heart square pattern adds a sweet and cozy touch to the blanket, making it a cherished keepsake for years to come. Whether you're an experienced crocheter or a beginner looking for a new challenge, this baby blanket is a delightful project to work on. The soft yarn and pastel colors create a soothing and gentle aesthetic that is sure to bring smiles and warmth to both the crafter and the baby. So grab your crochet hook, pick out your favorite yarn, and get ready to create a beautiful and heartfelt gift for a precious little one in your life.
Difficulty: Intermediate
Size: Square: approx. 6.75" x 7"
Finished Baby Blanket (with border): approx. 35" x 37"
Supplies:
Size H (5 mm) Crochet Hook
Scissors
Darning Needle
Worsted Weight Yarn, 2 colors per square, 32 yards of each color
For Baby Blanket Border, 225-250 yards
Colors used in example:
Red Heart Super Saver: Aran, Buff, Cafe, Coffee, Aran Fleck,
Buff Fleck, Oatmeal
Vanna's Choice: Barley, Off-White
I Love This Yarn!: Desert Dust
Abbreviations (US terms):
BLO - Back Loop Only
C1 - Color 1
C2 - Color 2
Ch - Chain
Dc - Double Crochet
Sc - Single Crochet
Ss - Slip Stitch
St - Stitch
Important Notes:
-Color changing and carrying the yarn is used for this pattern, if you haven't worked a pattern with color changing/carrying I suggest you check out my tutorial above, skip to 00:05:15 timestamp.
-Gauge is not important for this pattern unless you want the exact same size as I have listed above, in that case, my gauge is: 5 sc x 4 rows = 1"
Heart Square
(make 25 for baby blanket size)
Starting with C1:
Row 1: Ch 30, sc in 2nd ch from hook and in each remaining ch across. Ch 1, turn. (29)
Row 2: Sc in each st across. Ch 1, turn. (29)
The next row begins our color changing and carrying. I will be listing in order how many sc should be worked for each color. Remember, C1 = Color 1 (outside of the heart color) & C2 = Color 2 (heart color).
If you need help with the color changing/carrying, you can watch the tutorial and skip to 00:05:15 timestamp.
Row 3: C1: 14 sc, C2: 1 sc, C1: 14 sc. Ch 1, turn. (29)
Row 4: C1: 13 sc, C2: 3 sc, C1: 13 sc. Ch 1, turn. (29)
Row 5: C1: 12 sc, C2: 5 sc, C1: 12 sc. Ch 1, turn. (29)
Row 6: C1: 11 sc, C2: 7 sc, C1: 11 sc. Ch 1, turn. (29)
Row 7: C1: 10 sc, C2: 9 sc, C1: 10 sc. Ch 1, turn. (29)
Row 8: C1: 9 sc, C2: 11 sc, C1: 9 sc. Ch 1, turn. (29)
Row 9: C1: 8 sc, C2: 13 sc, C1: 8 sc. Ch 1, turn. (29)
Row 10: C1: 7 sc, C2: 15 sc, C1: 7 sc. Ch 1, turn. (29)
Row 11: C1: 6 sc, C2: 17 sc, C1: 6 sc. Ch 1, turn. (29)
Row 12: C1: 5 sc, C2: 19 sc, C1: 5 sc. Ch 1, turn. (29)
Row 13: C1: 4 sc, C2: 21 sc, C1: 4 sc. Ch 1, turn. (29)
Row 14: C1: 3 sc, C2: 23 sc, C1: 3 sc. Ch 1, turn. (29)
Row 15: C1: 2 sc, C2: 25 sc, C1: 2 sc. Ch 1, turn. (29)
Repeat row 15 until you have 22 rows completed, then move on to row 23 below.
Row 23: C1: 3 sc, C2: 11 sc, C1: 1 sc, C2: 11 sc, C1: 3 sc. Ch 1, turn. (29)
Row 24: C1: 4 sc, C2: 9 sc, C1: 3 sc, C2: 9 sc, C1: 4 sc. Ch 1, turn. (29)
Row 25: C1: 5 sc, C2: 7 sc, C1: 5 sc, C2: 7 sc, C1: 5 sc. Ch 1, turn. (29)
Row 26: C1: 6 sc, C2: 5 sc, C1: 7 sc, C2: 5 sc, C1: 6 sc. Ch 1, turn. (29)
Row 27: C1: 7 sc, C2: 3 sc, C1: 9 sc, C2: 3 sc, C1: 7 sc. Ch 1, turn. (29)
After row 27 you can cut the C2 yarn end.
Row 28: Sc in each st across. Ch 1, turn.
Row 29: Sc in each st across.
After row 29 you will need to make a sc border around the entire square.
Row 30
: Ch 1, turn. *Sc in each st across. When you reach the end of the row, ch 2 & rotate to work along next edge.* Repeat from *to* 3 additional times then join with a ss to the first sc you made of the edge.
Fasten off & sew in your ends.
Joining Squares
After you have completed your 25 squares you will need to join them in your desired arrangement. To join your squares lay them with the faces touching and ss the squares together using the sc edge. You can do this by working through both loops or use just the outside loops on each square. I suggest viewing the video tutorial for this part of the pattern, you can skip ahead to about the 00:59:00 timestamp where I show examples of both joins.
Ruffle Border
For the border there is not an exact stitch count, this is unimportant but I still went ahead and listed a rough count for each row.
Row 1: Join in any st with a ss. Ch 1, *Sc in each st across. When you reach the corner, ch 2 & rotate to work along next edge.* Repeat from *to* 3 additional times then join with a ss to the first sc you made of the border. (roughly 151-155 per edge, 604-620 total)
Row 2: In BLO: Ch 1, 2 dc into each st around. Also work 2 dc into each chain on the corners using the BLO. (roughly 302-310 per edge, 1208-1240 total)
Fasten off and sew in ends.
No comments
Write a comment