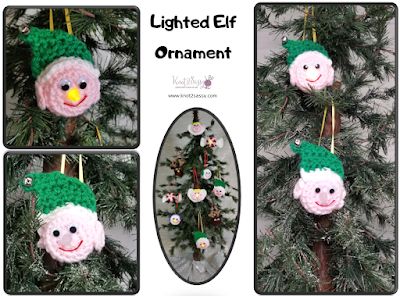
Crochet Lighted Elf Ornament
Looking to add a touch of whimsy and charm to your holiday decor? The Crochet Lighted Elf Ornament is the perfect choice! With its intricate crochet design and twinkling lights, this adorable elf is sure to bring a festive cheer to any room. It's a fun and festive way to brighten up your Christmas tree or add a playful element to your home decor. The combination of traditional crochet techniques with modern light features creates a unique and eye-catching decoration that will delight visitors of all ages. So, why not treat yourself to this delightful ornament and let its merry spirit light up your home this holiday season!
Yarn
Scrap amounts of the following colors in worsted weight yarn.
Light pink (or peach)
Green
White
Materials / Tools
Size G / 4.0mm crochet hook
Battery operated tea light
Red 3D fabric paint
2 – 10mm wiggle eyes
small jingle bell
stitch marker
craft glue
scissors
yarn needle
Difficulty Easy
Stitch Guide
ch - chain
st - stitch
sl st - slip stitch
sc - single crochet
hdc - half double crochet
hdc2tog – half double crochet 2 together
Notes
The “face” of this project is worked in continuous rounds.
Instructions
FACE
Round 1: With light pink (or peach) and G/4.0mm crochet hook make 10 sc in a magic circle making sure not to pull the center closed. Use a stitch marker to keep track of each round by placing it in the first stitch and move it up for each round. (10 sc)
Round 2: Work 2 sc in each st around. (20 sc)
At this point I like to place the “flame” of the candle into the center hole and adjust making sure it fits snugly then I secure and weave in the center yarn tail.
Rounds 3-7: sc in each stitch around. Do NOT fasten off, Place the stitch marker in the loop of the last stitch and cut a long enough tail for sewing then set aside. (If your tea light happens to be a little taller you can add an 8th round)
EARS
Left Ear: With light pink (or peach) Make 4 sc, 1 hdc, 1 dc in magic circle. Finish off without joining. Weave in the end leaving the tail from the center of the circle for sewing.
Right Ear: With light pink (or peach) Make 1 dc, 1 hdc, 4 sc in magic circle. Finish off without joining. Weave in the end leaving the tail from the center of the circle for sewing.
HAT
Row 1: With white yarn ch 11, hdc in 3rd ch from hook and in each ch across (10 hdc) finish off white yarn, turn
Row 2: Join green yarn, ch 2 (counts as 1st hdc now and throughout), hdc2tog, hdc in next 5 st, hdc2tog (8 hdc), turn
Row 3: ch 2, hdc2tog, hdc in next 3 st, hdc2tog (6 hdc), turn
Row 4: ch 2, hdc in next 5 st, ch 4, turn
Row 5: hdc in 3rd ch from hook and in next ch, hdc in next 2 st, hdc2tog, finish off leaving last sts unworked.
Now lay the hat across the top of the face along the 4th row and sew into place. Then use a 10 in piece of yarn or ribbon and loop it right behind the hat as a hanger so it will easily hang on the tree. Next making sure the circle is pulled nice and tight, sew the ears just below the edge of the hat with the dc pointed up.
Place the crocheted piece on the tea light by sliding it on like a sock making sure the “flame” fits nice and snug in the hole of the face. Put your yarn needle on the tail you left and start weaving it around the last row tightening it just enough to fit snugly around the base of the tea light but making sure the on/off button is still operational.
Finishing
Fasten off and weave in ends. Now all that’s left is glue on the wiggle eyes, sew the jingle bell onto the top point of the hat and use the red 3D paint to make a mouth.
No comments
Write a comment