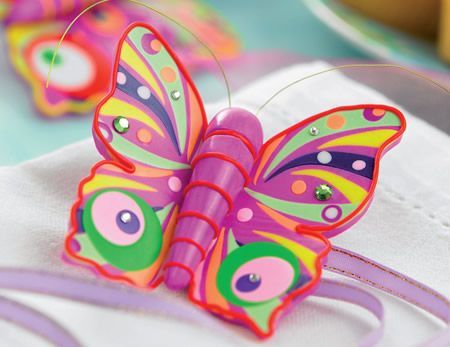
Colourful Polymer Clay Butterfly
Creating a colourful polymer clay butterfly is such a fun and whimsical project! The beauty of working with polymer clay is that you can let your creative spirit soar as you mix and match vibrant colors to bring your butterfly to life. Whether you're a seasoned crafter or just starting out, sculpting a polymer clay butterfly is a delightful way to express your creativity and add a pop of color to your day. Each butterfly you create is unique and reflects your own personal style, making it a truly special piece of art that you can cherish or share with others. So go ahead and embrace the magic of working with polymer clay to craft your very own colourful butterfly masterpiece!

WHAT YOU NEED...
- Polymer clay, 58gm blocks; raspberry, Indian red, purple, lime green, lemon, brilliant blue, white, black
Cookie cutter, butterfly
Wire, beading
Ribbon
Glue
Cutting mat
Craft knife
Tracing paper
Tin foil
Needle
INSTRUCTIONS
- Modelling - 1. Roll out a ball of clay as large as your butterfly cutter or template, 0.5cm thick, in any rich colour, such as deep raspberry pink. Mix greens and pinks to create a range of ice cream colours. Roll out until thin and cut triangle shapes 2-3cm in length. Place them freely around the butterfly wings and press in using a sheet of tracing paper with a weight on top.
2. The tracing paper will keep your unbaked clay surface smooth and clean from fingerprints and fly-away dust. Using a weight such as a heavy book or small marble slab will distribute any pressure evenly. If you use a rolling pin the shapes you have created will become distorted. The weight will keep any mishaps to a minimum.
3. Roll any left-over ice cream colours into small circles. Press on top of the triangles. Then weight these circles as before, this time making smaller discs in a contrasting colour, and placing them over the larger circle to create the butterfly eyes.
4. Once the wings have been decorated, press the butterfly cutter into the flat clay. Roll a thin length in bright contrasting colour such as yellow or orange and run it around the outline of the butterfly for definition.
5. For the butterfly body, make a small roll of clay, the length of the cutter and slightly narrower than your little finger. Shape a gentle round point for the tail and a ball the size of a large pea for the head. Press two small holes into the top of the head where the coloured wire can be glued in to form the feelers after baking.
6. Using a large needle or other pointed craft tool, gently push a hole through the base of the wings and body, so the ribbon can pass through to secure the butterfly onto the basket. If your butterfly is too small and delicate, roll a ball of clay and stick it under the body then make a hole through that.
7. Before baking, to add movement, gently squeeze the wings towards the body so the butterfly will look like it has just settled on your basket. Make two scrunched up rolls of tin foil to support under the wings whilst baking. Carefully place the butterfly on a clean non-stick baking tray and pop in oven for 30 minutes at 130°C.
8. After the butterfly has cooled varnish with either a matt or gloss finish, then embellish with gems and crystals for extra effect. Glue the wire feelers and thread some coloured ribbon through the hole in the body and tie to a basket.