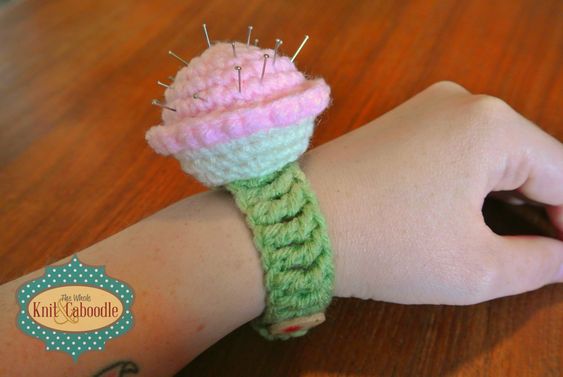
Crochet Cupcake Pin Cushion
The Crochet Cupcake Pin Cushion is an adorable and practical addition to your crafting essentials. This charming pin cushion not only keeps your pins organized and easily accessible but also adds a delightful touch to your crafting space. With its colorful yarn and intricate crochet details, it brings a fun and whimsical flair to your sewing area. The cupcake design is not only cute but also functional, making it a joyful way to store your pins safely. Whether you are a seasoned crafter or just starting out, this Crochet Cupcake Pin Cushion is sure to bring a smile to your face every time you reach for a pin.
Here’s what you’ll need:
A size F5/3.75mm hook
Approx. 8 yds of worsted weight yarn in your choice of colour for the “”frosting”.
Approx. 4 yds of worsted weight yarn in your choice of colour for the cupcake bottom.
Approx. 6 yds of worsted weight yarn in your choice of colour for the bracelet.
A 3/4″ button
Yarn needle for weaving in ends
A small amount of polyester stuffing.
Gauge isn’t terribly important. Using a F5/3.75mm hook I ended up with a cupcake that is about 2 1/4″ wide and 1 1/2″ high.
Cupcake:
Rnd 1: Using frosting colour, make a magic circle. Ch 1. Work 6 sc in circle, pull tail to close circle tightly. (6)
Rnd 2: Work 2 sc in each st around. (12)
Rnd 3: *Sc in next st, 2 sc in next* repeat ** around. (18)
Rnd 4: *Sc in next 2 sts, 2 sc in next* repeat ** around. (24)
Rnds 5 & 6: Sc in each st around. (24)
Rnd 6: Ss in each st around. (24)
Rnd 7: (For each st of this rnd you will be inserting your hook up under both loops of the slip stitches from the previous rnd, NOT the single crochets into which you worked your slip stitches.) *2 sc in next st, ss in next* repeat ** around. Finish off, weave in end. (24 sc, 12 ss)
Rnd 8: Join cupcake bottom colour in any of the sc stitches from rnd 6. Ch 1 (counts as a sc). Sc in each st around. (24)
Rnd 9: Sc in each st around. (24)
Rnd 10: *Sc in next 2 sts, sc 2 tog* repeat ** around. (18)
Rnd 11: (Working in back loops only) *Sc in next st, sc 2 tog* repeat ** around. (12)
Stuff cupcake firmly.
Rnd 12: (Working in both loops). {Sc 2 tog} x 7. Finish off, weave in end. (5)
Bracelet:
With bracelet colour, ch until you reach desired length. I chained 34 and got a bracelet of about 7″.
Tr in 5th ch from hook and in each ch across. Finish off and weave in ends.
Sew bracelet to underside of cupcake.
Before attaching the button, stitch together two of the triple crochets at one end. This just reinforces the material beneath the button.
What I like about the bracelet is that it is adjustable- you just put the button through the spaces between the triple crochets and make it as tight or as loose as you’d like.
If you use pins with the coloured plastic ends, they look like sprinkles!