Beautiful DIY Pin Cushion with Stand
Creating a beautiful DIY pin cushion with a stand can be a fun and rewarding project for anyone who loves crafting. Not only does it serve a practical purpose, but it also adds a charming touch to your workspace. By choosing fabrics and colors that speak to your personal style, you can make a pin cushion that truly reflects your creativity. The stand adds a unique twist, offering a convenient way to keep your pins handy while working on sewing projects. Whether you gift it to a fellow crafter or keep it for yourself, this DIY project is sure to bring joy and a sense of accomplishment. So, gather your materials, unleash your creativity, and enjoy the process of making your own beautiful pin cushion with a stand!

DIY Pin Cushion Supplies
You can use any candle holder style for the stand that appeals to you. A flat-top wide candle holder would likely be easier to use. Besides a candleholder, you will need:
- Scrap piece of fabric
- Something round to draw a circle 8 inches across
- Lavender seeds
- Lavender essential oil (optional)
- Needle and strong thread or embroidery thread
- E 6000 glue
- Wooden dowel or wood cupboard pull that fits inside the top of the candlestick.
- Vintage doily and lace
- White ribbon
- Large eyed needle
- Elastic optional
- Sewing pins
Step One – Attach Pin Cushion Stand
Decide how to attach the pin cushion to the candle stick stand. How you attach it depends on the candlestick, and if you’re willing to glue the pin cushion directly on the candle stick. My little candlestick had a Czechoslovakian sticker on it, and I don’t want to marr it in any way. I did not have a large enough piece of doweling to fit in my candlestick, after digging around I found a wooden door pull that fits and slides down into the candlestick.

Step Two – Make the Stuffing Packet
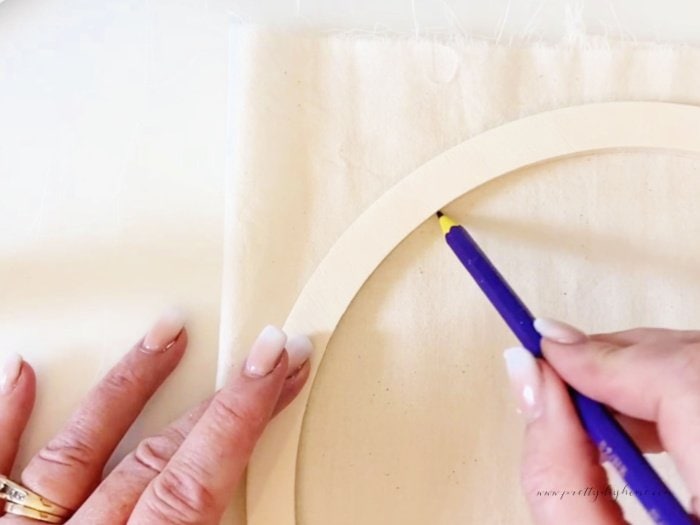
Lay your ironed fabric down on a flat surface. Cut two circles of muslin in an 8-inch circle. Iron and layer the fabric. Use a bowl, pie plate, or a wreath form as a guide, and draw a circle on the fabric with a pencil. Cut out the circle of fabric.

Take a needle with a good quality thread, use a double thread with a knot on the end for extra strength. Make sure the length of your strong thread (or embroidery floss) is at least two feet long. This will give you enough thread to pull on later. With both fabric circles together, hand stitch a loose running stitch half an inch from the outer edge. Once done, pull the threads until the center of the cushion closes and forms a little pocket with a hole at the top.

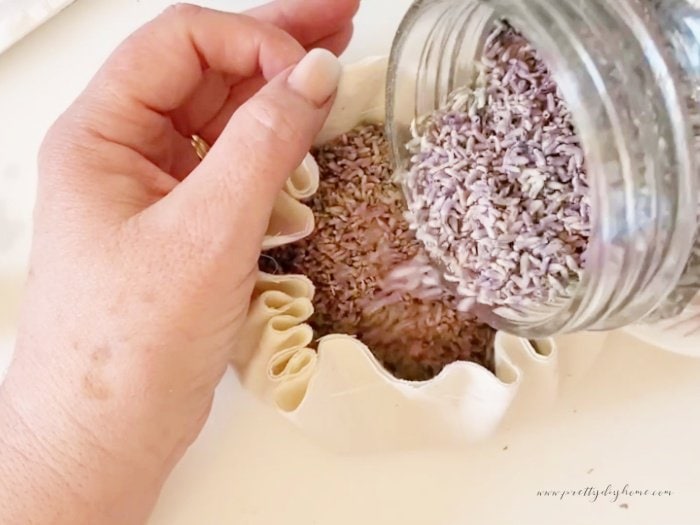
Step Three – Add the Stuffing
Add the stuffing through the small opening. You can use walnut shells, plastic crafting pellets, steel wool, sand, or wool felt. I chose to use lavender seeds for mine and sprinkled some lavender essential oil on as well. It won’t sharpen my pins, but I doubt it will rust them.
Step Four – Closing Stuffing Pocket
The method you use for closing the stuffing pocket depends on your candlestick.
Single Candle Stick – If using a dowel or a door pull, cover it well with E 6000 glue, especially on the underside. Place it inside the center of the fabric circle with the post part sticking out. Pull the threads to close the pincushion bottom, making sure the hole is as tight as possible. Press the edges of the fabric against the glue. Finish it with a few hand stitches to hold all the edges together. Place inside the candle holder.
Flat Top Wide Candle Holder – If using a flat-top wide candle holder skip the door pull. Instead, pull the thread on the fabric circled until the bottom of the pincushion closes. Hand stitch to hold all the edges together. Glue the bottom with the E-6000, place it on top of the candle holder, and press down.
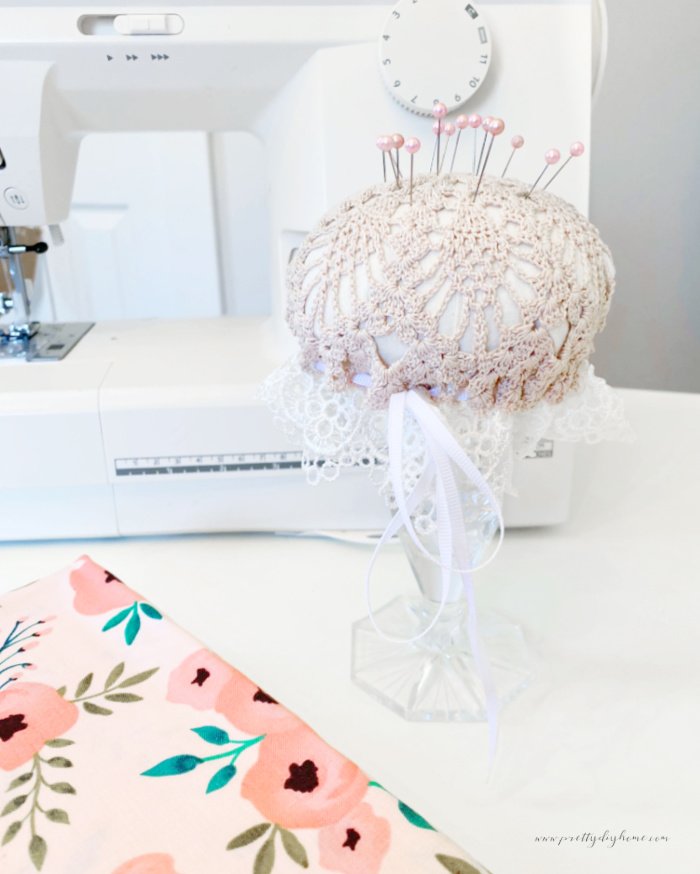
Step Five – Create the Pincushion Top
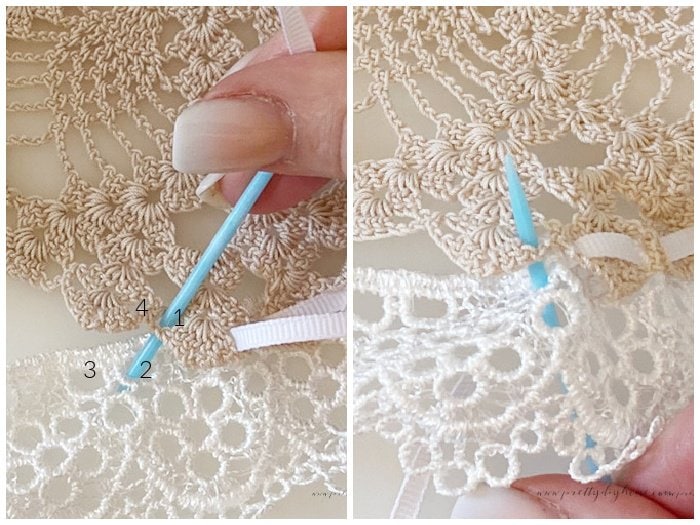
Vintage Doily and Lace – I found a beautiful handmade vintage crochet doily at the thrift store, the clerk told me to take it, and it’s beautiful. I first placed the ecru-colored doily on top of the pincushion it was plain and a little bit small. To add contrast I used a thin piece of ribbon like you would thread and a large-eyed needle to hand stitch white lace to the underside of the doily.
When adding lace to the doily, look for a repetitive pattern, and then use the holes in the pattern to attach the two pieces together. This prevents us from having to gather anything the patterns in doily and lace have evened it out for us. The pictures show the four spots with holes I used to attach pieces.
Scrap Fabric – You can use the stand idea with a fabric circle made from different fabrics. If you want to use fabric instead, zig-zag stitch the raw edges of the fabric circle first, and then use a sewing machine to sew lace to the edge. Once sewn place the pincushion cover over the base, thread the lace with the ribbon, and pull tight. Tie the ribbon in a pretty bow.
Step Six – Decorating the DIY Pin Cushion
DIY pincushions are a great project for using up small pieces of fabric. Especially if you have a favorite fabric pattern you want to add to your sewing space
Homemade gifts even quick projects like this one make very thoughtful gifts. This particular DIY pincushion would be a great gift idea for Mother’s Day, sewing friends, a crocheting craft friend, or a good friend who loves thrifting and upcycling.
To add color to your pin cushion stitch on little flowers, in soft pastel colors, mine is staying neutral for now. This new pincushion is meant to stand pretty with lots of sparkle in my craft room window. It will still be within easy reach for most of my projects, and of course, it’s easily movable.