Paper Snowman Craft
Creating a paper snowman craft is a delightful winter activity that brings out the inner artist in everyone! Start by cutting out different-sized circles from white paper to stack and form the snowman's body. Using colorful paper or markers, add a carrot nose, coal eyes, and a charming scarf to give your snowman personality. Don't forget to add button details and a top hat for that classic snowman look. This craft is a fun and easy way to spread some winter cheer while getting creative with materials you already have at home. So, gather your supplies and enjoy making your very own paper snowman to brighten up the season!
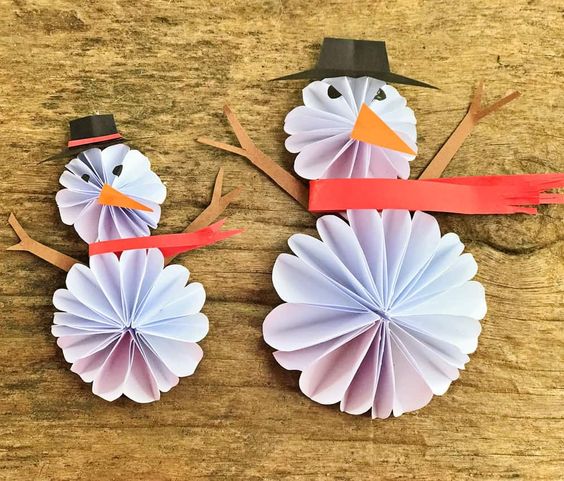
Snowman Paper Craft – Materials:
- Paper in colors white, orange, red, black and tan (note the thinner like copy paper the better for easier folding vs. thick cardstock)
- Glue
- Scissors
INSTRUCTIONS:
Cut 8 circle each that are 8cm and 6cm wide out of white paper.
Fold one circle in half. Fold that piece into half too. Now it looks like a pizza slice
Repeat this step with the rest of the 15 circles
Separate both sizes and take one large size circle.
Unfold one crease and apply a glue line on the middle of the slice.
Fold back and press to stick the slice.
Apply a glue line again on the top slice.
Glue the next folded circle slice.
Repeat this for the rest of folded pieces of the same size.
Glue the end slices. Now it looks like an umbrella.
Repeat the same steps for the small size slices.
Cut Carrot nose, hat, stick arms and scarf out of colored papers.
Cute a 3cm x 9cm piece of white paper.
Glue the snowman sticks arms and scarf on it first.
Glue the body and head.
Decorate the snowman with the rest of the body parts (nose, hat eyes)
Ta-Da! It is ready for the winter!