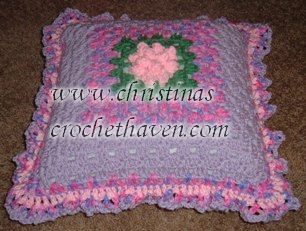
Crochet Popcorn Center Pillow
The Crochet Popcorn Center Pillow is a delightful addition to any cozy home decor. With its charming popcorn stitch design at the center, this pillow brings a touch of whimsy and texture to your space. Perfect for adding a warm and inviting feel to your living room or bedroom, it effortlessly blends comfort and style. The soft yarn used in making this pillow ensures that it is not only visually appealing but also incredibly comfortable to snuggle up with. Whether you're a crochet enthusiast looking for a new project or someone who appreciates handmade accents, the Crochet Popcorn Center Pillow is a lovely choice to brighten up your surroundings.

| Materials Used | Approx. less than 3 ozs per yarn color worsted weight yarn |
| Hook Size | J |
| Measurements | |
| Notes | This is a great stash buster project. |
Ch 5, sl st to make a ring.
Row 1: Ch 3 (count as first dc) 4dc, drop loop from hook, insert hook in first st of the ch 3, pull dropped loop through, ch 3. * 5dc in ring, drop loop from hook, insert hook in first st of the 5dc group, ch 3. Repeat 2 more times from *. Sl st tog. Total of 4 popcorns and 4- ch 3 sps.
Row 2: Sl st into any ch 3 sp, ch 3 (count as first dc) 4dc, drop loop from hook, insert hook in first st of the ch 3, pull dropped loop through, ch 3. * 5dc in same ch 3 space, drop loop from hook, insert hook in first st of the 5dc group, ch 3. Sl st into next ch 3 space and repeat from *. Repeat in all ch 3 spaces from*. Sl st tog. Total of 8 popcorns and 8- ch 3 sps.
Row 3: This is where I attached green. Sl st into any ch 3 sp, ch 3. 2dc, ch 2, 3dc in same space. Ch 1, dc in next ch 3 space, ch 1. 3dc, ch2, 3dc in next ch 3 space. Ch 1, dc in next ch 3 space, ch 1. 3dc, ch2, 3dc in next ch 3 space. Ch 1, dc in next ch 3 space, ch 1. 3dc, ch2, 3dc in next ch 3 space. Ch 1, dc in next ch 3 space, ch 1. Sl st tog and sl st two spaces to corner. Total of 4 corners made and 4- dc by themselves.
Row 4: Now comes the normal granny, make normal corner 3dc, ch2, 3dc. 3dc in ch 1 space. Repeat around. Just like a normal granny. Refer to picture for reference.
Row 5: Change colors if desired. I changed to Girly Print from RH. This row is the same as a normal granny.
Row 6: This starts off as a normal granny, but changes for the middle st of the 3dc. In the middle st, tr instead of a dc and do it in the middle of the stitch from the previous row. Once again, look at the picture for reference.
Row 7: Do normal granny st.
Row 8: Repeat Row 6.
Row 9: Repeat Row 7.
Row 10: Repeat Row 6.
Row 11: Repeat Row 7.
Row 12: Repeat Row 6.
Row 13: Repeat Row 7.
Fasten off and weave in ends.
Place wrong sides together, match stitches up and attach yarn to corner. I did 2 and half sides before putting pillow form in. Put pillow form in and finish sewing sides up. *Ch 3, sc in next stitch. Repeat from * around. Change colors and attach yarn (sl st) in ch 3 space. *Ch 3 and sc in next ch 3 space. Repeat from * around. Change colors and attach yarn (sl st) in ch 3 space. *Ch 3 and sc in next ch 3 space. Repeat from * around. Fasten off yarn and weave in ends.