DIY Popsicle Stick Uncle Sam Decoration
Looking to add some patriotic flair to your decor? Why not try creating a DIY Popsicle Stick Uncle Sam Decoration! This fun and easy craft project is great for all skill levels and perfect for celebrating holidays like Independence Day. All you need are some popsicle sticks, paint, and a touch of creativity to bring Uncle Sam to life. Whether you're a crafting pro or just starting out, this project is sure to add a festive touch to your home. So grab your supplies, get creative, and let Uncle Sam adorn your space with patriotic charm!
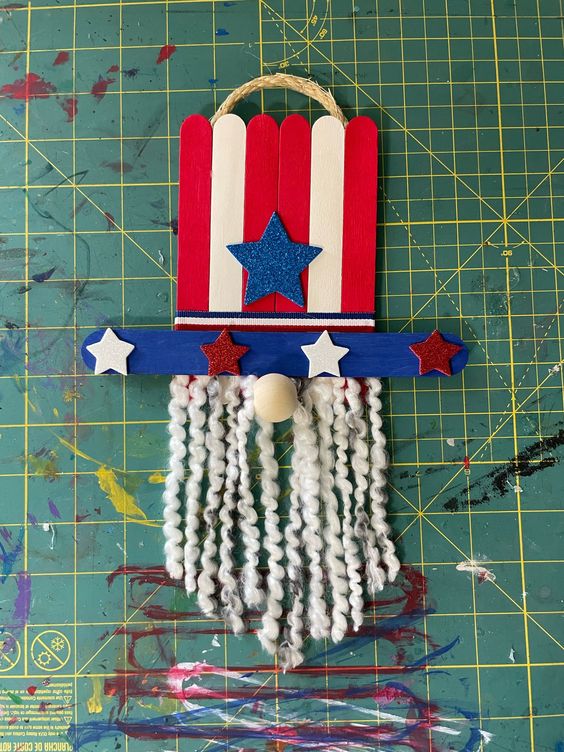
Supplies in the Kit
- 7 mid-size popsicle sticks
- 2 large popsicle sticks
- Acrylic paint in red, white, and blue
- Paintbrush
- America stuff - we used ribbon, sparkle glitter sticker stars, and stickers
- 2 yards of yarn for the beard, cut into 6” lengths - Uncle Sam’s beard is predominantly white, so we chose lighter colors in a “beardy” yarn. Could also use white cotton rope, or anything that looks like a beard to you.
- Large wooden bead for the nose
- Scissors
- Hot glue
- Double sided tape
- 6” of rope twine for hanging
Here’s how
- Cut one of the bigger sticks in half with the scissors. It’ll take some doing, but it’s possible I promise.
- Set the big sticks/pieces and one of the mid-size popsicle sticks aside. With the remaining 6, plan your hat design. Will you alternate red and white every other stick? Will you do two thicker stripes by doing two sticks the same color? Half the sticks white and the other half red?
- Paint the sticks. Start from light to dark so that your white paint doesn’t get tainted by red or blue, and do a double coat on each one. According to your design, paint all your white sticks twice, then the red sticks twice. Then paint the large (intact) stick blue…twice.
- Let them dry for 5 minutes or so. Take a potty break or something.
- Once they’re dry, put the blue hat brim to the side, and put the red and white sticks into the layout you planned earlier.
- Flip the sticks over, maintaining the layout, and lining them up carefully so that the ends are straight in line with each other.
- This step is important - it’s the structural integrity step, and the setup for the hanging string later. No pressure. Using one of the half-stick pieces from the first step, put a healthy line of hot glue down the stick. Place it horizontally across the vertical sticks about an inch down from the top. Do the same thing with the other half of the big stick about an inch from the bottom of the vertically lined sticks.
- Flip him back over. Admire your handiwork thus far.
- Remember that one lonely mid-size stick we set aside earlier? Put a line of hot glue down it, and stick it centered horizontally about an inch from the bottom of the vertical sticks. This is the foundation for the beard.
- Another design step - figure out the beard layout using the yarn lengths, and put them in line right below that stick we just glued down. It’s ok if the yarn is different lengths, we’ll trim him up later.
- Place a piece of double-sided tape all the way down the horizontal stick to help hold the yarn for the beard in place.
- Place your yarn lengths on the tape across the horizontal stick according to your layout. Start and end directly under the vertical sticks (the hat); don’t go to the ends of the horizontal stick. Don’t let the top yarn tips pass the top of the horizontal stick.
- Put a line of hot glue down the back of the blue hat brim stick, and carefully place it on top of the beard yarn stick - make sure it’s straight and even.
- Embellish the hat. Ribbon, stickers, etc.
- Pick up that wooden bead, and put it under the center of the hat. Locate the two beard strands that are directly right and left of it, leaving one strand between them. Push them through the hole so that they cross each other, and pull them tight so they hold the bead up under the hat. I used the end of my paintbrush to poke the yarn through.
- Squirt a little hot glue into the bead hole to hold everything in place.
- “Brush” the beard strands down, and give him a trim. Traditional Uncle Sam angle, straight across, your call.
- Flip him back over.
- Place a dot of hot glue on the left side of the top horizontal stick, and place the end of the twine in the glue. Watch your fingers.
- Same on the right side.
- Hang him up and enjoy!!
No comments
Write a comment