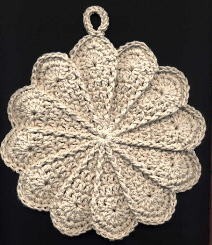
Crochet Scalloped Potholder
Are you looking for a fun and creative project to spruce up your kitchen? The Crochet Scalloped Potholder is a fantastic choice! Not only is it practical for protecting your hands from hot pots and pans, but it also adds a charming touch to your kitchen decor. With its delightful scalloped edge, this potholder is sure to impress your guests and brighten up your cooking space. Whether you're an experienced crocheter or a beginner looking for a new challenge, this project is perfect for all skill levels. So grab your crochet hook, pick out some colorful yarn, and get ready to create a lovely and functional accessory for your kitchen. Happy crocheting!
Materials: About 4 oz. worsted weight cotton yarn
Crochet hook size G
Finished size: About 8”
Make 2
Leaving a 6” yarn tail, ch 4, join with a sl st to form ring
Round 1: Ch 3 to count as the first dc, work 11 more dc in the ring; join
with a sl st to the top of the beginning ch 3. (12 dc)
Round 2: Ch 3 to count as the first dc, fpdc around the ch 3 of round 1; (dc
in the next dc, fpdc around the same dc) around; join with a sl st to the top
of the beginning ch 3. (24 sts)
Round 3: Ch 3 to count as the first dc, dc in the top of the next fpdc, fpdc
around the same fpdc; (dc in the next dc, dc in the top of the next fpdc,
fpdc around the same fpdc) 11 times; join with a sl st to the top of the
beginning ch 3. (36 sts)
Round 4: Ch 3 to count as the first dc, dc in the next dc, dc in the top of the
next fpdc, fpdc around the same fpdc; (dc in the next 2 dc, dc in the top of
the next fpdc, fpdc around the same fpdc) 11 times; join with a sl st to the
top of the beginning ch 3. (48 sts)
Round 5: Ch 3 to count as the first dc, dc in the next 2 dc, dc in the top of
the next fpdc, fpdc around the same fpdc; (dc in the next 3 dc, dc in the top
of the next fpdc, fpdc around the same fpdc) 11 times; join with a sl st to
the top of the beginning ch 3. (60 sts)
Round 6: Ch 3 to count as the first dc, dc in the next 3 dc, dc in the top of
the next fpdc, fpdc around the same fpdc; (dc in the next 4 dc, dc in the top
of the next fpdc, fpdc around the same fpdc) 11 times; join with a sl st to
the top of the beginning ch 3. (72 sts)
Round 7: Sl st in each of the next 2 dc, ch 3 to count as the first dc, work 6
more dc in the same st, skip next 2 dc, sc in the top of the next fpdc, *skip
next 2 dc, 7 dc in the next dc, skip next 2 dc, sc in the top of the next fpdc*
Repeat from * to * 10 times; join with a sl st to the top of the beginning ch
3. (12 shells)
Round 8: Ch 1, sc in the same st as joining, sc in each of the next 2 dc, 3 sc
in the next dc, sc in each of the next 3 dc, fpsc around the next fpdc of
round 6, skip the sc in the top of the fpdc, *sc in each of the next 3 dc, 3 sc
in the next dc, sc in each of the next 3 sc, fpsc around the next fpdc of
round 6, skip the sc in the top of the fpdc* repeat from * to * 10 times; join
with a sl st in the first sc. Fasten off.
Finishing: Holding wrong sides together, tie the center yarn tails together
tightly. This will prevent the potholder from separating and coming
apart when washing. Matching the scallops of both pieces, sc the
pieces together around the outside of the potholder, adding a (ch 12, sl st
in the 12th ch from hook) at the top of any scallop to form a hanging ring.
Fasten off. Weave in ends.