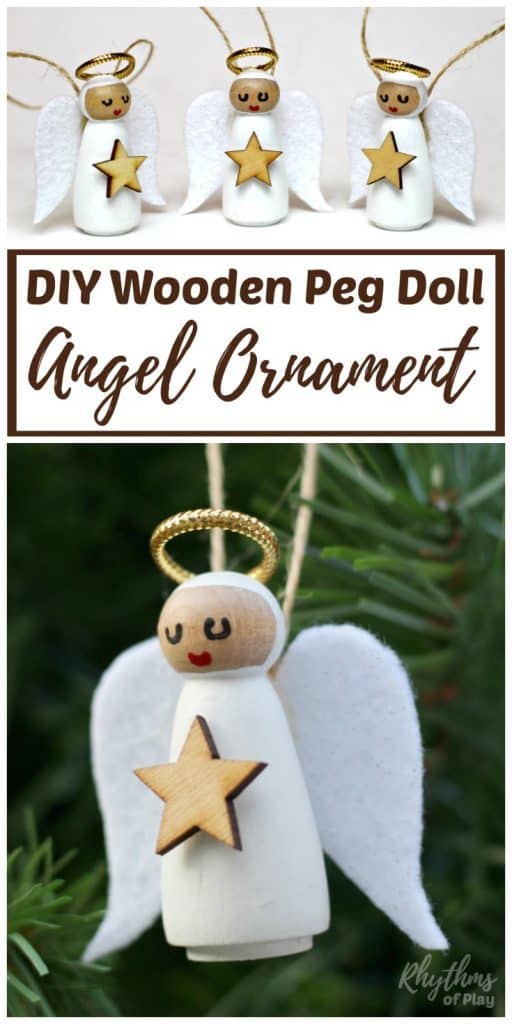
Angel Christmas ornaments are a lovely addition to any holiday decor, bringing a touch of serenity and beauty to your Christmas tree. These ornaments come in a variety of styles, from delicate glass angels with intricate details to whimsical plush angels perfect for a more playful theme. Whether you prefer classic gold and silver angels or modern and colorful designs, there is an angel ornament to suit every taste. Placing these charming decorations on your tree can add a special touch, reminding us of the joy and peace that the holiday season brings. So, why not sprinkle a few angel ornaments around your tree this year and let their heavenly presence uplift your Christmas spirit?
DIY ANGEL CHRISTMAS ORNAMENTS CRAFT SUPPLIES:
Unfinished wooden angel dolls or assorted wooden peg dolls (We used 2-inch wooden female peg dolls to make the angels in the photographs, but other peg doll size options are available to make smaller or larger ornaments and figurines.)
White acrylic paint (or soft pastel paint colors of choice: blue, pink, yellow, etc.)
Paintbrushes
Mod Podge or another sealant with foam brushes
Printable angel wing template (This printable includes several angel wing size outline options to make angel figurines and ornaments with different sizes of peg dolls.)
Stiff white felt, white glitter felt, lace butterfly appliques, or another stiffened fabric of choice.
Sewing scissors
Fabric marking pen with disappearing ink
Extra fine-tip paint pens (or an incredible nib with black and red acrylic paint)
Christmas or Jute twine, or Christmas ribbon
Use a tinsel, non-stretch gold or silver metallic cord. (We used the same metallic tinsel cord to make these DIY wand crafts.)
Wooden stars (We used 1-inch wooden stars with 2-inch unfinished wooden angel peg dolls to make the angel crafts shown in the photographs. However, you can use the larger or smaller stars in this pack of assorted wooden stars to make angel ornaments with smaller or larger wooden peg dolls.)
Glue gun with glue sticks
Painter’s tape (optional)
Safety Note: Because hot glue is needed to make these DIY angel ornaments, children will need guidance and supervision on safely using a hot glue gun before getting started with this Christmas craft. It’s also best to read through the step-by-step instructions to ensure you have everything you need to complete your angel Christmas ornaments ready to go, especially if you are making them with children.
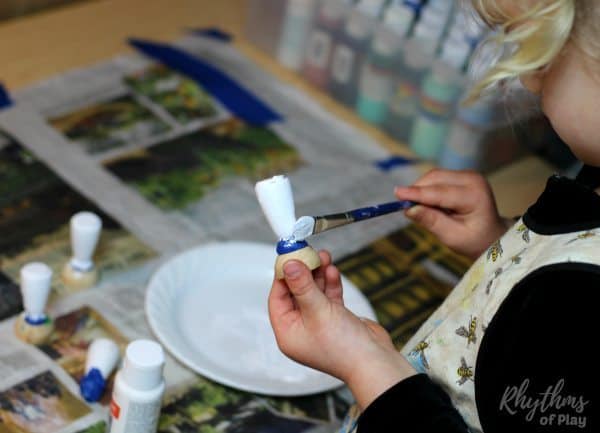
1. PAINT WOODEN PEG DOLL BODIES.
Use a paintbrush to paint the bodies of the wooden peg dolls white (or another pastel paint color of choice) from the neck down.
Do not paint the heads yet. We will paint them in the next step.
If you will be working with children, it’s a good idea to wrap painter’s tape around the heads of the wooden peg dolls. Taping the heads makes it easier for toddlers, preschoolers, and other young children to help paint these handmade angel ornaments. (Kids can quickly help paint the body of the angel ornaments when the heads are protected, but it is optional and unnecessary for older children.)
Please allow the paint time to dry before moving on to the next step in this Christmas angel craft.
2. PAINT THE HEAD OF EACH ANGEL ORNAMENT CRAFT.
We painted the “heads” of our DIY angel ornaments using the technique described in detail in our DIY fall fairy craft tutorial.
We also made these cute winter fairy peg doll crafts with the same painting technique.
Learn how to paint the angel’s heads, as shown in the photographs, with the step-by-step instructions below:
Look at the head of your peg doll and decide which part you want to be the face of the angel craft.
Paint a line from shoulder to shoulder over the head. Don’t worry if this first line is messy. You will clean it up next.
Paint the back of the peg doll head on the opposite side you choose for the face.
Clean up the first line and square off the head by painting across the forehead of the wooden peg doll.
Touch up and paint the neck of the peg doll and any other areas that need cleaning up around the fairy’s face.
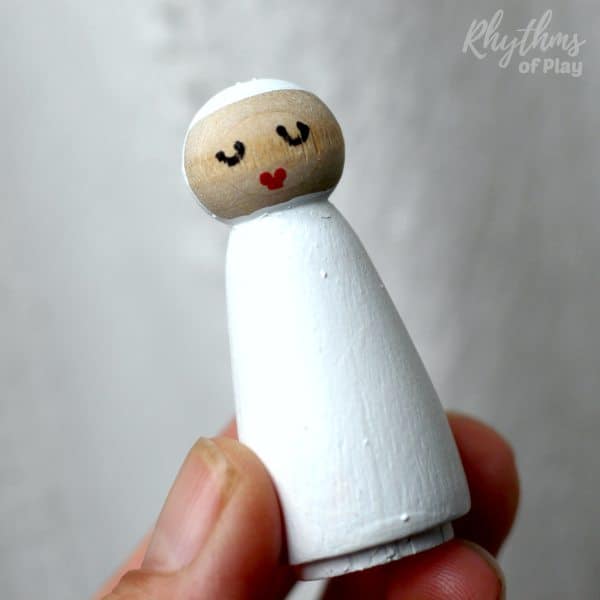
3. PAINT THE FACES OF THE ANGEL CHRISTMAS ORNAMENTS.
Once again, we painted the eyes of the angel figurines shown in the photographs with the same technique we used to make the U-shaped eyes for the fall fairy crafts.
First, follow the steps below to make the eyes for each angel craft:
Dip an Incredible Nib into black or brown acrylic paint to make the eyes, or use a black or brown extra fine-tip paint pen.
Mark two sets of two dots with a brown or black paint pen to create the eyes of each of your angels.
Connect each set of dots with a “U” to make the eyes of each angel doll.
Add small lines for lashes, or leave them plain, as shown in the photographs.
Alternatively, you can make simple dots for the eyes. Look at the step-by-step instructions for DIY Rainbow Peg Dolls to learn how to paint a slightly different face on your peg doll angel crafts.
Next, follow the steps below to paint the mouth of each angel ornament craft:
To make the angel’s pursed lips, dip an Incredible Nib into red acrylic paint or grab a red extra fine-tip paint pen.
Mark three dots under and between the U-shaped eyes so that there are two on top and one on the bottom to make the pursed heart-shaped angel mouth.
4. SEAL AND PROTECT HANDMADE ANGEL ORNAMENTS.
Use a foam brush to paint Mod Podge (or another type of sealant) onto the wooden peg dolls to seal and protect them before moving on to the next step.
Mod Podge is a glue, so please don’t use a regular paintbrush to do this step unless you don’t mind throwing it away when you are finished.
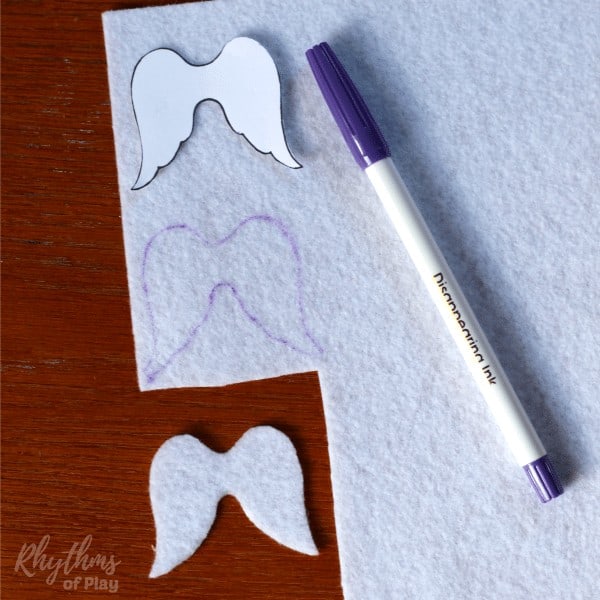
5. PRINT, TRACE, AND CUT ANGEL WINGS FOR THE DIY ANGEL CHRISTMAS ORNAMENTS.
Print the angel wing template out on cardstock and cut it out. Cardstock creates a stiff template for the angel wings you can easily trace and use repeatedly. Because there are so many sizes of wooden peg dolls available these days, we provide several printable angel wing templates to ensure that you have an angel wing template size that fits.
Trace the angel wing template with a fabric marking pen with disappearing ink onto the white glimmer or stiff white felt. Trace one set of angel wings for each DIY angel ornament you make. Disappearing ink will automatically disappear from the felt in 24 – 48 hours. It can also be washed off with water. Using disappearing ink will ensure that you do not have an ugly trace line visible along the edge of the angel wings. We’ve tested it to work perfectly–even on white felt!
Cutting felt can be challenging, especially for young children. We recommend using a good pair of sewing scissors to make it easier. Unfortunately, cutting the scalloped edges of the angel wings is even more difficult for kids. So I had my daughter trace and cut the inside edge of the angel wings with a straighter edge that looks just as beautiful. You are welcome to do the same to make your angel ornaments. (The step-by-step angel Christmas ornament DIY photo tutorial below shows you how we cut the wings for our ornaments.)
6. TURN ON THE GLUE GUN.
A glue gun is needed to complete the next few steps of this DIY project.
Before you turn it on, ensure you have instructed children to use one safely and everything you need is standing by, ready to go.
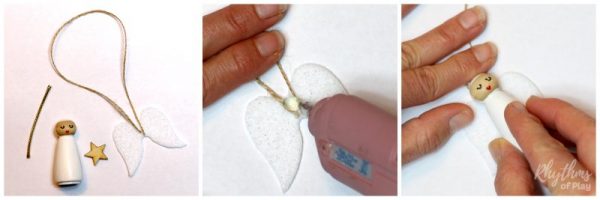
7. GLUE THE ANGEL WINGS AND AN ORNAMENT HANGER TO EACH WOODEN ANGEL ORNAMENT.
For this step in the angel craft project, you will need one pair of felt angel wings and 6-10 inches of twine or ribbon for each ornament craft you make.
However, you won’t need the twine hanger loop if you want this angel craft to be a standing figurine instead of a hanging ornament.
First, arrange the twine or ribbon in a loop, then glue it between the angel wings and the wooden peg doll, as shown in the photo tutorial in the next section.
If you don’t want to add the hanger, glue the angel wings directly onto the back of the angel without the loop.
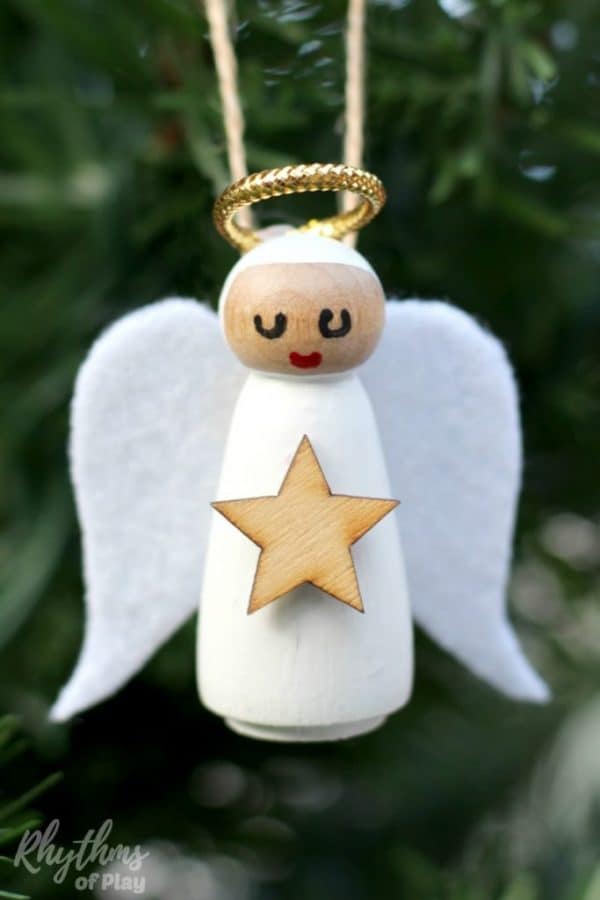
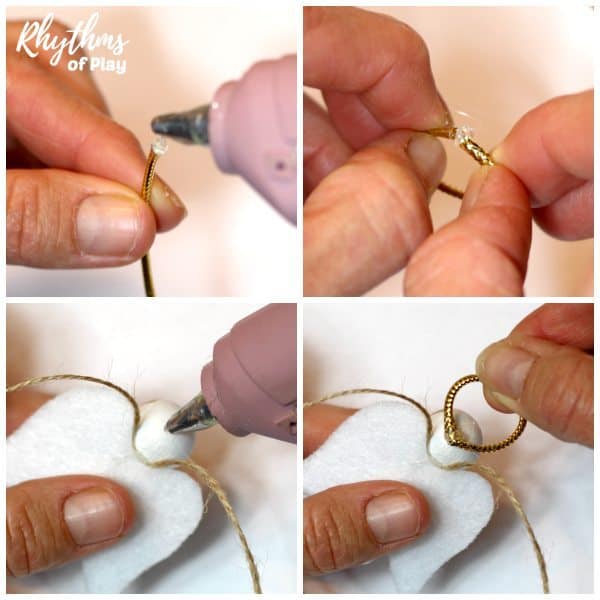
8. MAKE A HALO FOR EACH ANGEL ORNAMENT CRAFT AND GLUE IT TO THE BACK OF EACH WOODEN PEG DOLL HEAD.
First, cut a section of gold or silver non-stretch tinsel cord about two inches long for each wooden peg doll angel ornament.
Use a glue gun to put a dab of glue on one end of the gold cord. Then, quickly insert the other end of the cord into the glue to attach both sides together before the hot glue dries.
Finally, place a dab of hot glue on the top of the head towards the back of each wooden angel ornament to attach a halo to each angel’s head.
Ensure that each angle’s halo is tipped up slightly.
Note: This step may sound challenging, but the cord is easy to attach with a glue gun and holds beautifully without much effort. (Unless your toddler or cat gets ahold of it–lol!)
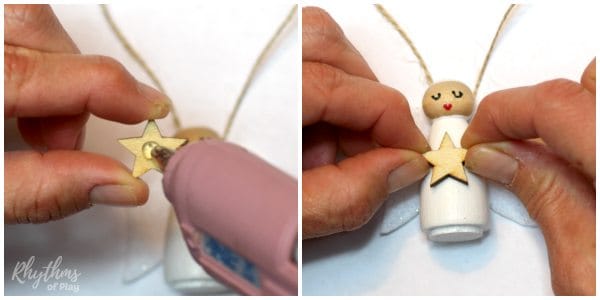
9. GLUE WOODEN STARS ON THE FRONT OF THE DIY ANGEL ORNAMENTS.
First, place a dab of hot glue on the back of a wooden star.
Next, attach the star to the front of the wooden peg doll angel ornament, as shown in the DIY angel ornaments photo tutorial below.
(Use the same metallic tinsel cord to make these DIY wand crafts.)