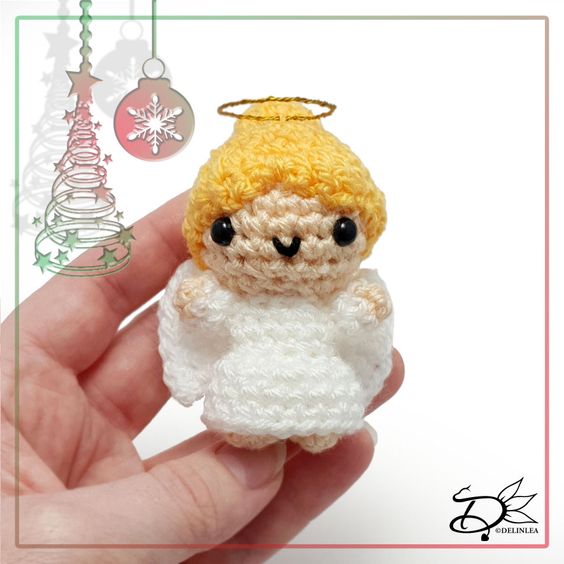
Crochet Angel Amigurumi
Crochet Angel Amigurumi dolls are not just adorable toys; they bring a touch of charm and whimsy to any space they inhabit. These sweet, handmade creations are perfect for gifting to loved ones or adorning your own home with a sprinkle of cozy magic. With their delicate wings and serene expressions, Crochet Angel Amigurumi figures are sure to put a smile on anyone's face. Whether you're a seasoned crafter or a beginner looking to try your hand at amigurumi, creating these heavenly beings can be a delightful and rewarding experience. So grab your crochet hook, choose your softest yarn, and let your creativity soar as you craft your very own Crochet Angel Amigurumi to spread joy and sweetness wherever they go.
For this pattern you’ll need:
♥ Yarn in the colors White, Beige and Yellow. (I used Stylecraft Special DK)
♥ Bit of extra Black yarn to create her mouth.
♥ Crochet hook. ( I used 3mm)
♥ Stuffing.
♥ Yarn Needle.
♥ Sewing Pins.
♥ Stitch Marker.
♥ Safety Eyes, 6mm.
♥ A bit of Gold wire to make her Halo. (Optional)
Stitches used (US Terms):
Magic Ring.
CH = Chain.
SLST = Slip Stitch.
SC = Single Crochet.
HDC = Half Double Crochet.
DC = Double Crochet.
ST = Stitch.
FL = Front Loops.
BL = Back Loops.
Inc = Increase.
Dec = Decrease.
(…) = Repeat the space in brackets the given number of times.
[…] = Total number of stitches.
This pattern is made with continues rounds, unless stated otherwise. Use a stitch marker to mark your first/last stitch of your row.
Pattern Angel
Head
Use the color Beige.
1: 6SC in a Magic Ring. [6]
2: 2SC in each st around. [12]
3: (1SC, inc) 6 times. [18]
4: (5SC, inc) 3 times. [21]
5: 21SC. [21]
6: 21SC. [21]
7: 21SC. [21]
8: (5SC, dec) 3 times. [18]
Place the eyes between row 6&7, about 5st apart.
9: (1SC, dec) 6 times. [12]
Stuff the head.
10: Dec around. [6]
Fasten off and weave in tail.
Body
Start with the color Beige.
1: 6SC in a Magic Ring. [6]
2: 6SC. [6]
Break the yarn and make another leg using row 1&2.
Change to the color White.
3: 3SC, make the next SC in the other leg, 6SC, go back to the first leg, 3SC. [12]
4: 12SC. [12]
5: 12SC. [12]
6: BL, 12SC. [12]
7: 12SC. [12]
8: (2SC, dec) 3 times. [9]
Fasten off and leave a long tail for sewing.
Stuff the body as well.
Skirt
Start with the color White.
At row 6 of the body you worked in BL, now you will work in the FL.
1: FL, 12SC. [12]
2: (1SC, inc) 6 times. [18]
3: 18SC. [18]
4: 18SC. [18]
Fasten off and weave in tail.
Arms (Make 2)
Start with the color Beige.
1: 6SC in a Magic Ring. [6]
Change to the color White.
2: 6SC. [6]
3: 6SC. [6]
Fasten off and leave a long tail for sewing.
Hair
Use the color Yellow.
1: 6SC in a Magic Ring. [6]
2: 2SC in each st around. [12]
3: (1SC, inc) 6 times. [18]
4: (5SC, inc) 3 times. [21]
5: 21SC. [21]
6: 21SC. [21]
7: 1SC, 1HDC, 2DC in the next st, 1HDC+1SlSt in the next st, 1SlSt+1HDC in the next st, 2DC in the next st, 1HDC, 1SC, 1HDC, 10DC, 1HDC, SlSt in the first st.
Fasten off and leave a long tail for sewing.
Bun
Use the color Yellow.
1: 6SC in a Magic Ring. [6]
2: 2SC in each st around. [12]
3: 12SC. [12]
4: (2SC, dec) 3 times. [9]
Fasten off and leave a long tail for sewing.
Don’t forget to stuff the bun.
Wings (Make 2)
Use the color White.
This part isn’t made with continues rounds.
1: Ch4, insert in the second ch from hook, 3SC, turn. [3]
2: Inc, 1SC, inc, turn. [5]
3: Inc, 3SC, inc, turn. [7]
4: 7SC. [7]
Fasten off and leave a long tail for sewing.
Assembling
Whenever I start assembling Amigurumi, I’d like to use sewing pins to position all parts first until I’m happy. Then I will sew them on. I recommend you do so as well.
Sew her head to her body. Next sew on the arms. Then sew on the hair on her head, and don’t forget to add her bun as well. Last sew on the wings to her back. Bend a halo for the wire and attach it to her head. With a bit of Black yarn, create her Mouth.
If you want to hang it, don’t forget to add a loop to the top.