Christmas Tree Twig Ornaments
Christmas tree twig ornaments are a delightful way to add a touch of rustic charm to your holiday decor. These cute and eco-friendly decorations bring a bit of nature indoors and can easily be crafted with simple materials like twigs, twine, and a dash of creativity. Whether you're going for a minimalist or a cozy cabin look, these tiny ornaments are sure to bring a smile to your face. They make for a fun DIY project that you can enjoy alone or with loved ones, creating lasting memories as you adorn your tree with these unique and handmade treasures. So, gather some twigs, get crafty, and let your imagination run wild this holiday season!
TWIG CHRISTMAS TREE ORNAMENT CRAFT SUPPLIES:
Collect and gather twigs or sticks (directions are in the next section), or use THESE.
Pruning shears
Wooden stars (assorted sizes)
Glue gun with glue sticks
Jute, baker’s twine, or Christmas ribbon (optional)
DIY TWIG TREE CRAFTS AND CHRISTMAS ORNAMENTS: STEP-BY-STEP INSTRUCTIONS
When the twig tree craft supplies are ready and a glue gun is set to a low temperature and safely set aside, follow the step-by-step instructions below to make rustic tree twig ornaments.
1. TRIM AS MANY TWIGS TO THE DESIRED LENGTH AS YOU NEED.
If not already done, use a pair of garden shears to trim twigs to the desired length in the number of pieces you need to make as many twig tree ornaments as you want.
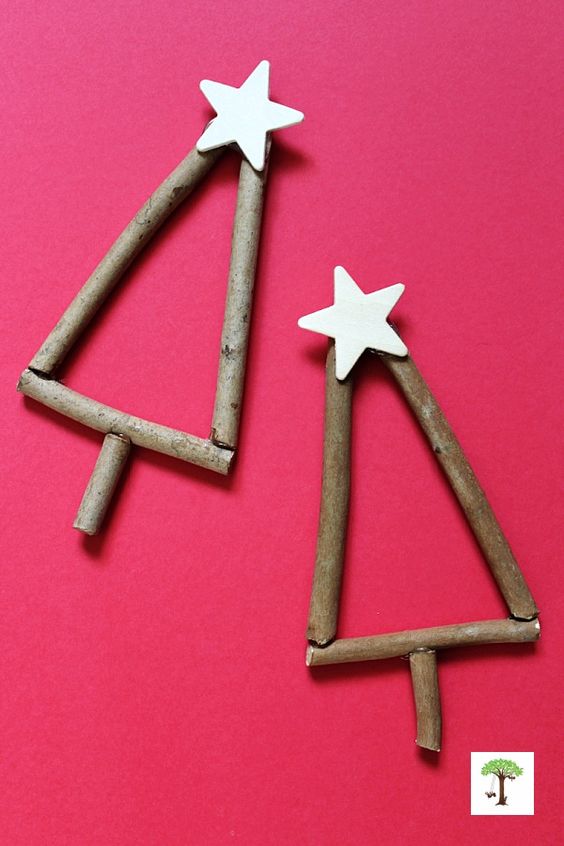
To make each twig Christmas tree ornament craft, you will need the following:
One wooden star.
Two twigs or sticks that are four to ten inches long. (Cut these twigs to approximately the same desired length for the sides of the Christmas tree.)
One twig that is two to five inches long. (This stick will form the bottom of the twig Christmas tree craft.
A shorter stick will produce a taller, skinnier twig tree craft, while a longer twig will create a shorter Christmas tree ornament craft.)
A final twig or stick that is half to two inches long. (This small final twig is for the trunk of the Christmas tree ornament. Cut it to the length you prefer.)
Length of Jute, bakers, or ribbon that is five to ten inches long (optional)
2. GLUE A LOOP OF TWINE OR RIBBON ONTO THE BACK OF A WOODEN STAR (OPTIONAL).
This step is optional: If you don’t want to add a hanger to the twig tree ornament, skip this step and move on to step three in the next section.
As mentioned, twig Christmas tree ornaments can also be hung directly on the tree without a hanger or loop (if desired).
To hang a twig tree without a hanging loop, thread it onto a tree limb or branch through the center of the Christmas tree ornament, as shown in the photograph above.
If you want the DIY Christmas tree twig ornaments to have hangers, follow the steps below:
First, cut a five to eight-inch length of Jute twine or Christmas baker twine.
Then, fold the length of the twine in half to create the loop for the twig tree ornament hanger, with the ends of the loop next to and parallel to one another, as shown in the DIY twig tree ornament video tutorial below.
Next, place a drop of glue on the back of the wooden star.
Finally, lay both ends of the twine loop in the glue, as shown in the DIY twig tree video tutorial below.
3. GLUE A PAIR OF TWIGS TO THE BACK OF THE WOODEN STAR AT AN ACUTE ANGLE.
Create the top of the twig Christmas tree by gluing the twigs cut to the same length for the sides onto the back of the wooden star at an acute angle of less than ninety degrees.
This step is demonstrated in the Christmas twig tree ornaments video below the written instructions. Press play to watch this step in action.
4. ADD THE THIRD TWIG TO MAKE THE BOTTOM OF THE CHRISTMAS TREE TWIG ORNAMENTS.
Use pruning shears to trim a third twig about an inch long and set the smaller piece aside for use in step five below.
This final stick will be laid across the bottom to connect the first two sticks to complete the Christmas tree.
When this step is complete, you will have a small triangle in your hands with a star glued at the top.
5. GLUE THE FOURTH AND FINAL TWIG TO CREATE THE BOTTOM OF THE TWIG CHRISTMAS TREE
Please pick up the larger piece of the remaining twig and put a dollop of hot glue on both sides of the stick to attach it in place.
6. ADD THE TRUNK TO THE BOTTOM OF THE TWIG TREE ORNAMENT TO COMPLETE THE CHRISTMAS TREE CRAFT.
Glue the final twig at the bottom of the twig tree to create the trunk.
Please ensure that this final piece is glued in the middle and perpendicular to the bottom stick of the twig tree. For a bit of whimsy, you can also glue the truck so it sits off-center.
As shown in the DIY video tutorial below, we use the small section of twig that remains after cutting the third twig to make the bottom of the trunk ornament.
In other words, we use the small piece of twig left over after trimming the third stick to the size we’d like for the bottom of the twig ornament.
7. PAINT OR DECORATE TWIG TREE CRAFTS (OPTIONAL).
Enhance twig tree crafts and ornaments by painting them in festive colors, adding glitter, or wrapping them with yarn or small fairy lights.
Adorn them with miniature ornaments and figurines to create a woodland scene or Christmas display.
Add ribbons for extra flair.
Or leave them natural, as shown in the photograph below, and allow their simple rustic charm to add a festive touch to Christmas trees and other winter holiday decor.
No comments
Write a comment