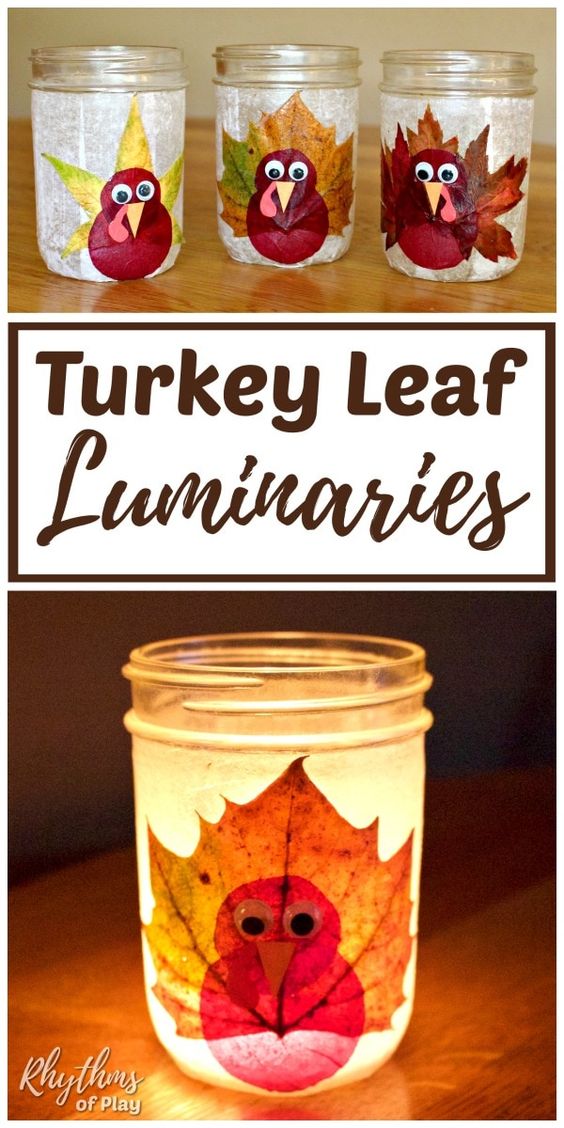
Get ready to elevate your Thanksgiving decor with some whimsical Thanksgiving Turkey Leaf Lanterns! These charming lanterns are a fun and festive way to bring the spirit of the season into your home. Simply gather some colorful fall leaves, a mason jar, a tealight candle, and a bit of creativity. Start by gluing the leaves onto the jar to create a beautiful autumnal pattern. Then, place the tealight candle inside the jar and watch as the warm glow illuminates the intricate leaf design, casting a cozy ambiance in any room. Whether you're looking to spruce up your Thanksgiving table or add a touch of charm to your mantle, these Turkey Leaf Lanterns are sure to delight your guests and bring a smile to your face. So, roll up your sleeves, grab your glue gun, and get ready to craft your way to a picture-perfect Thanksgiving celebration filled with gratitude and creativity!
Materials:
Real or fabric fall leaves
Wide-mouth mason jars (we used 16-ounce canning jars)
Mod Podge
Foam brush
White tissue paper
Burgundy or brown tissue paper (or use construction paper to make the turkey more opaque and less transparent or see-through)
Orange and red construction paper
Googly eyes
Scissors
Pencil
Beeswax tea lights or votives, flameless tea light candles, or fairy lights
HOW TO MAKE LEAF LANTERNS: STEP-BY-STEP DIRECTIONS FOR MASON JAR LUMINARIES
1. COLLECT, CLEAN, AND PRESS FALL LEAVES TO MAKE THANKSGIVING MASON JAR LANTERNS.
First, invite children on a nature walk to collect beautiful autumn leaves to make these cute turkey crafts.
Next, use the directions below to clean the autumn leaves and press them flat before using them to make a Thanksgiving turkey leaf lantern craft:
Rinse autumn leaves with water.
Gently pat dry with a towel.
Use a press to flatten leaves gently OR:
Place several leaves between paper or paper towels to absorb any excess moisture.
Put a large, heavy book or another heavy, flat object on top of the paper and leaves to flatten or press the leaves.
Allow leaves to be pressed for several hours before using them to make leaf luminary crafts.
Learn more about pressing and preserving leaves–>HERE.
We used natural, fresh fallen autumn leaves to make the Thanksgiving lanterns in the photographs, but you can also use flexible artificial leaves.
Play with arranging the leaves on the canning jars and decide how you would like to make them into turkey crafts before getting the glue out.
2. CUT TISSUE PAPER STRIPS AND PARTS FOR EACH THANKSGIVING TURKEY CRAFT OR AUTUMN LEAF LUMINARY.
Cut the following parts for each DIY fall leaf luminary:
Strips of white tissue paper 1 1/2 to 2″ wide and slightly longer than the glass jar you use to make each leaf lantern.
Trace the bottom of the canning jar onto white tissue paper and cut out the circle.
A small triangle of orange construction paper for the turkey beak.
An amoeba-like shape of red construction paper for the turkey wattle.
Circles of burgundy or brown tissue or construction paper for the head and the body of the turkey craft. (We traced the top of a tapered shot glass for the body of each turkey and the bottom of the same shot glass for the head of each turkey craft.)
3. PAINT GLUE ONTO THE GLASS CANNING OR MASON JAR.
First, place your hand inside the wide-mouth mason jar to hold it.
Next, use a foam brush to apply Mod Podge or a slightly watered-down white glue to the entire canning jar, starting below the threads.
Use long downward brush strokes to paint the glue onto the mason jar.
Most glues will appear white when painted but will dry clear.
4. STICK THE TISSUE PAPER STRIPS ONTO THE MASON JAR LANTERN THANKSGIVING CRAFT.
Keeping your hand inside the glass jar, carefully stick the circle-shaped tissue paper onto the bottom.
Next, carefully place each tissue strip onto the mason jar one by one and wrap the strips around the bottom.
Paint Mod Podge or another white glue all over the strips to glue the tissue paper to the sides and bottom of the mason jar. Make sure you wrap each strip of tissue paper down, stick it to the bottom of the jar, and paint glue over the top.
5. PAINT GLUE OVER TISSUE PAPER ON THE MASON JAR LUMINARIES.
Carefully reapply Mod Podge or watered-down white glue to the sides and bottom of the canning jar on top of the tissue paper of each glass jar luminaries.
This will seal the tissue paper and protect it if it gets wet–but don’t put it in the dishwasher! (These cute little autumn leaf luminaries should only be washed gently by hand.)
Gently smooth out any air bubbles by gently rubbing the tissue paper from the top of the mason jar down if needed.
6. GLUE A FALL LEAF ONTO EACH TURKEY LUMINARY (OR SEVERAL AUTUMN LEAVES) TO MAKE EACH LEAF LANTERN CRAFT.
Paint glue onto the underside of each leaf and carefully arrange it onto the mason jar lanterns.
Position the fall leaves so they look like the fan of feathers behind a turkey. Or, arrange them around the jar if you are not making your DIY lanterns into turkey crafts.
We have learned through trial and error that fall leaf luminaries, look much better when lit if the autumn leaves are not overlapped. (Overlapping leaves look beautiful in the daylight, but it is too dark to see the features of the leaves or the turkey when the lantern is lit. So we recommend using only one autumn leaf for each turkey leaf lantern craft.)
Or, arrange the fall leaves around the jar (so that they do not overlap) if you are not making a turkey craft, and instead, only use colorful autumn leaves to make DIY mason jar lantern crafts.
You can move the fall leaves around before they dry, but be careful not to disturb the tissue paper.
Smooth out any air bubbles by gently rubbing the leaf(s) from the center out.
7. CAREFULLY PAINT MOD PODGE OVER THE LEAVES ON THE MASON JAR LEAF LUMINARIES.
Use a foam brush to paint Mod Podge (or watered-down white glue) onto each autumn leaf to seal, preserve, and protect each DIY lantern.
8. GLUE TURKEY CRAFT PARTS ON THE FALL LEAF TO FINISH THE FALL LEAF LUMINARIES (OPTIONAL).
Place your hand inside the jar to hold it.
First, place the body circle towards the bottom of the jar.
Then, paint Mod Podge on top of the body circle with a foam paintbrush.
Next, place the head circle so it slightly overlaps the body circle.
Then, paint Mod Podge on top of the head circle.
Next, glue on the beak and wattle.
Then, paint Mod Podge on top of the beak and wattle.
Finally, put the googly eyes on the face of the turkey to finish the Thanksgiving turkey craft.
9. PLACE TURKEY LEAF LUMINARIES (OR PLAIN AUTUMN LEAF LANTERNS) UPSIDE DOWN AND ALLOW THEM TO DRY.
Carefully put each leaf lantern craft upside down to dry.
10. PUT A CANDLE (OR FAIRY LIGHTS) IN EACH LEAF LUMINARY CRAFT.
Once they are dry, flip them over to put beeswax tealights (or votives), flameless tea lights, or a strand of fairy lights into your DIY leaf lanterns and display them as autumn home decor, or give them away as a gift.
If you use real candles, we recommend putting a little sand in the bottom of the lantern before placing the candle on top (optional).
Autumn leaf luminaries as cute as these little turkeys also make a great thankful or blessing jar, and a wonderful hostess gift for Thanksgiving dinner!