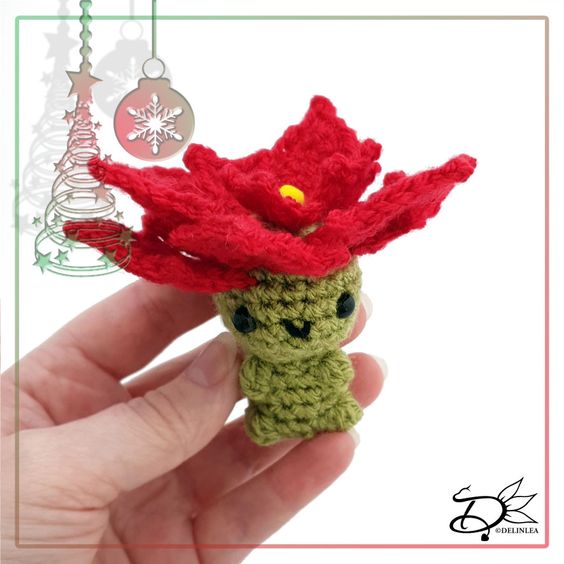
Crochet Poinsettia Amigurumi
Crochet Poinsettia Amigurumi is a delightful craft project that combines the charm of amigurumi with the festive beauty of poinsettia flowers. These small crocheted creations can make wonderful holiday decorations or thoughtful gifts for friends and family. Creating a Crochet Poinsettia Amigurumi is a fun and rewarding experience that allows you to showcase your creativity and spread joy during the holiday season. With a few basic crochet stitches and some colorful yarn, you can bring these adorable poinsettia blossoms to life, adding a touch of handmade charm to your home decor. So, grab your crochet hook and get ready to spread some holiday cheer with these adorable Crochet Poinsettia Amigurumi creations!
For this pattern you’ll need:
♥ Yarn in the colors Red and Green. (I used Stylecraft Special DK)
♥ Bit of Black yarn to make his mouth.
♥ Crochet hook. ( I used 3mm)
♥ Stuffing.
♥ Yarn Needle.
♥ Sewing Pins.
♥ Stitch Marker.
♥ Safety Eyes, 6mm.
♥ Tiny, Yellow pompoms to create the middle of the flower, and some (Fabric)Glue.
Stitches used (US Terms):
Magic Ring.
CH = Chain.
SLST = Slip Stitch.
SC = Single Crochet.
HDC = Half Double Crochet.
DC = Double Crochet.
Picot = Picot of 3SlSt.
BB = Bobble Stitch.
FL = Front Loops.
BL = Back Loops.
ST = Stitch.
Inc = Increase.
Dec = Decrease.
(…) = Repeat the space in brackets the given number of times.
[…] = Total number of stitches.
This pattern is made with continues rounds, unless stated otherwise. Use a stitch marker to mark your first/last stitch of your row.
♥ Pattern Poinsettia
Body
Use the color Green
1: 6SC in a Magic Ring. [6]
2: 2SC in each st around. [12]
3: (1SC, inc) 6 times. [18]
4: (5SC, inc) 3 times. [21]
5: 21SC. [21]
6: 21SC. [21]
7: 21SC. [21]
8: (5SC, dec) 3 times. [18]
9: (1SC, dec) 6 times. [12]
10: (2SC, dec) 3 times. [9]
11: FL, 9SC. [9]
12: (1SC, inc, BB) 2 times, 2SC, inc. [12]
Place the eyes now between row 6&7, about 5st apart. It will be a bit fiddly but this way you know where the legs will be, so you know where the eyes go.
Stuff the head as well.
13: 12SC. [12]
14: 12SC. [12]
15: 4SC, (BB, 3SC) 2 times. [12]
Stuff the body.
16: Dec around. [6]
Fasten off and weave in tail.
Small Petal (Make 3)
Use the color Red.
Ch5, insert in second ch from hook, 1SC, 1HDC, Picot, 1HDC, 1SC+Picot+1SC in the last st, now continue to work along the other side of the chain, 1HDC, Picot, 1HDC, 1SC.
Fasten off and leave a long tail for sewing.
Big Petal (Make 7)
Use the color Red.
This part won’t be made with continues rounds.
1: Ch7, insert in second ch from hook, 5SC, 3SC in the last st, continue along the other side of the chain, 5SC, turn. [13]
2: 1SC, 1HDC, 1DC, Picot, 1DC, 2HDC, 1SC+Picot+1SC in the next st, 2HDC, 1DC, Picot, 1DC, 1HDC, 1SC.
Fasten off and leave a long tail for sewing.
♥ Assembling
Whenever I start assembling Amigurumi, I’d like to use sewing pins to position all parts first until I’m happy. Then I will sew them on. I recommend you do so as well.
To create the flower on top of his head, spread around the petals until you have a poinsettia like flower. Sew those on nicely. In the middle of the flower you will glue the tiny, Yellow pompoms. With a bit of Black yarn, create his Mouth
If you want to hang it, don’t forget to add a loop to the top.