Crochet Adorable Clutch
Crocheting an adorable clutch can be such a delightful and rewarding craft project! The versatility of crochet allows you to create unique designs and personalize your clutch to suit your style perfectly. You can choose your favorite colors, textures, and embellishments to make it truly one-of-a-kind. The process of crocheting a clutch can be calming and meditative, providing a sense of accomplishment as you see your creation come to life stitch by stitch. Whether you're a seasoned crochet expert or a beginner looking for a fun challenge, making an adorable clutch is a wonderful way to express your creativity and add a handmade touch to your accessories collection. So grab your yarn and hook, and let's get crocheting!
FINISHED MEASUREMENTS
7 inches wide x 12 inches long
MATERIALS
16 cross-dc = 4 inches; 8 cross-dc rows = 4 inches
PATTERN NOTES
Weave in loose ends as work progresses.
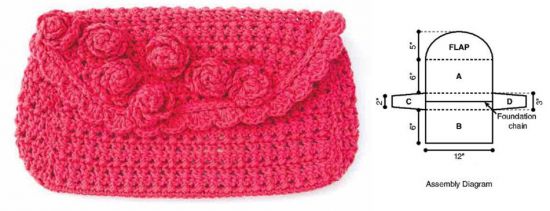
Clutch is crocheted in 5 sections (A,B,C,D and Flap). Section A is worked first, Section B is worked picking up stitches on opposite side of foundation chain of Section A, and Sections C and D are worked by working stitches along edges of bottom.
Flap is framed with fan stitches worked around edge of Flap.
Blossoms are crocheted separately and applied to the Flap.
Chain-1 at beg of row counts as first single crochet unless otherwise stated.
Chain-3 at beginning of row counts as first double crochet unless otherwise stated.
To decrease at the beginning of row, work 1 slip stitch for every stitch to be decreased.
To decrease at the end of row, leave stitch(es) to be decreased unworked.
Join with slip stitch as indicated unless otherwise stated.
SPECIAL STITCHES
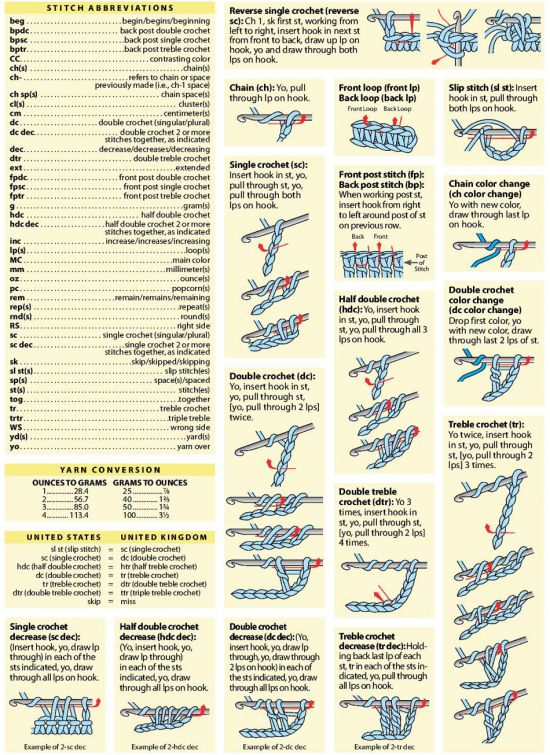
Crossed double crochet (cross-dc): [Sk next st, dc in next st, dc in front of sk dc] across.
Fan stitch (fan st): 5 dc in indicated st.
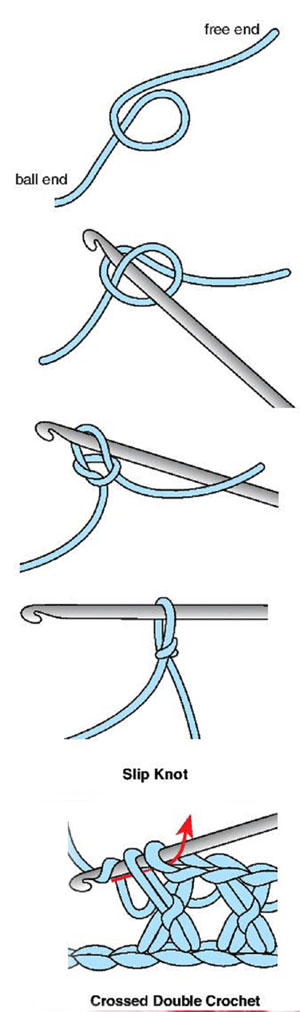
Surface slip stitch (surface sl st): Insert hook from RS through to WS, place slip knot (see illustration) on hook, yo, draw a lp to RS, [insert hook from RS to WS through next st, yo on WS, draw lp through to RS and draw through lp on hook] across.
CLUTCH
SECTION A
Row 1: Ch 42, sc in 2nd ch from hook (first sk ch counts as first sc), sc in each rem ch across, turn. (42 sc)
Rows 2-6: Ch 1 (see Pattern Notes), sc in each sc across, sc in beg ch-1, turn. (42 sc)
Row 7: Ch 3 (see Pattern Notes), cross-dc (see Special Stitches) across row to last st, dc in last st, turn. (20 cross-dc, 2 dc)
Rows 8-20: Rep row 7.
Row 21: Dec (see Pattern Notes) at the beg of row, cross-dc across row to 2 last sts, dc in next st, leaving last st unworked (see Pattern Notes), turn. (40 sts)
Row 22: Rep row 7.
Row 23: Rep row 21. (38 sts)
Row 24: Dec 2 dc at beg of row, cross-dc across to last 3 sts, dc in next st, leaving rem 2 sts unworked, turn. (34 sts)
Row 25: Rep row 24. (30 sts)
Row 26: Dec 3 dc at beg of row, cross-dc across to last 4 sts, dc in next st, leaving rem 3 sts unworked. Fasten off. (24 sts)
SECTION B
Row 1: With WS of opposite side of foundation ch of Section A facing, join (see Pattern Notes), yarn, ch 1, sc in each ch across, turn. (42 sc)
Rows 2-6: Ch 1, sc in each sc across, turn. (42 sc)
Row 7: Ch 3, cross-dc across to last st, dc in last st, turn.
Rows 8-17: Rep row 7. At the end of row 17, fasten off.
SECTION C
Row 1: With RS facing, working in 12 rows of sc, centered on foundation ch between Sections A and B (see Assembly Diagram) and working 1 st in each row, ch 3, cross-dc across to last st, dc in last st, turn. (12 sts)
Row 2: Ch 3, cross-dc across to last st, dc in last st, turn.
Row 3: Dc dec at beg of row, cross-dc across to last 2 sts, dc in next st, leaving last st unworked, turn. (10 sts)
Rows 4 & 5: Rep row 2.
Row 6: Rep row 3.(8 sts)
Rows 7 & 8: Rep row 2.
Row 9: Rep row 3. Fasten off (6 sts)
SECTION D
Row 1: With RS facing, working in 12 rows of sc, centered on foundation ch between Sections A and B (see Assembly Diagram) on opposite edge and working 1 st in each row, ch 3, cross-dc across to last st, dc in last st, turn. (12 sts)
Rows 2-8: Rep rows 2-8 of Section C.
FLAP EDGE
Row 1: With WS of Flap facing, join with sc in side edge of row 18 of Section A, [ch 1, sl next st, sc in next st] across to opposite edge of row 18, turn. (29 ch-1 sps)
Row 2: Fan st (see Special Stitches) in first ch-1 sp, [sl st in next ch-1 sp, fan st in next ch-1 sp] 14 times, sl st in next st. Fasten off. (15 fan sts)
Row 3: With RS facing, work surface sl st (see Special Stitches) across sts of row 1 of Flap Edge, inserting hook in ch-1 sps and sc across row. Fasten off.
BLOSSOM
Make 7.
Row 1: Ch 34, sc in 2nd ch from hook, sc in each rem ch across, turn. (33 sc)
Row 2: Ch 1, sc in first sc, [ch 3, sk next sc, sc in next sc] across, leaving a 12-inch length, fasten off.
Roll up Blossom into flower shape, thread tapestry needle with rem length. Stitch Blossom tog across opposite side of foundation ch, do not fasten off rem length.
ASSEMBLY
Thread tapestry needle with length of raspberry. Referring to Assembly Diagram, sew Sections C and D to Sections A and B along side edges.
Working across top edge of Sections D, B and C, reverse sc (see Stitch Guide) evenly sp around opening. Fasten off.
SECTION B ZIPPER CLOSURE
Row 1: With WS facing, working along row 17 of Section B and around the vertical post (see Stitch Guide) of sts, work 42 sc across, turn. (42 sc)
Row 2: Ch 1, sc in each of next 42 sc, turn.
Row 3: Ch 1, reverse sc in each of next 42 sc. Fasten off.
SECTION A ZIPPER CLOSURE
Row 1: With WS facing, working along row 17 of Section A and around the vertical post of sts, work 42 sc across, turn. (42 sc)
Rows 2 & 3: Rep rows 2 and 3 of Section B Zipper Closure.
ZIPPER
With a length of raspberry and tapestry needle, pin zipper on underside of Zipper Closure Sections A and B, sew zipper to underside of Zipper Closure on each side. Sew any rem open section of Zipper Closures A and B closed.
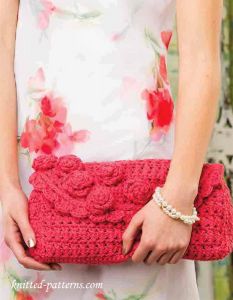
Sew Blossoms to the Flap as in photo or as desired.