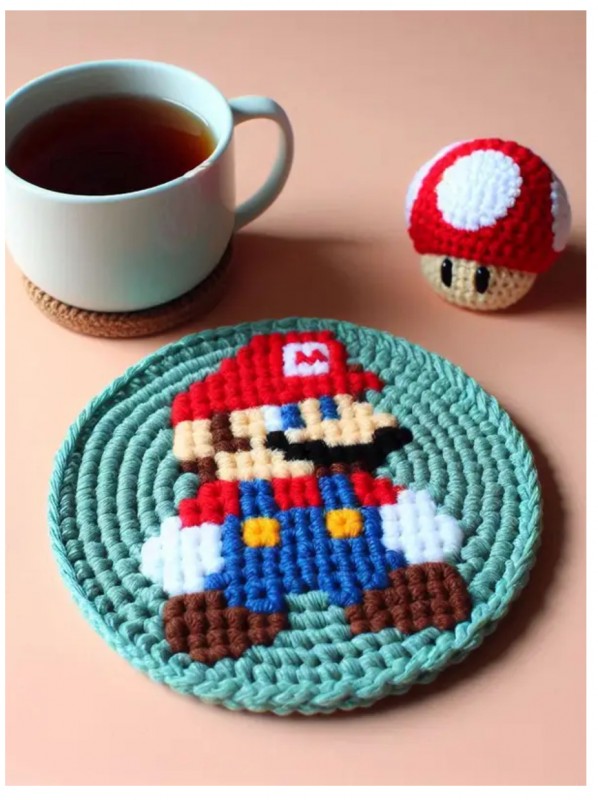
Crochet Mario Coaster
The Crochet Mario Coaster is a charming and colorful addition to any gaming-themed decor. Made with bright red yarn, this tiny Mario figurine is carefully crafted to capture the plumber's iconic mustache and cap, complete with a sweet smile. The crochet work is intricate and detailed, making it a delightful coaster for protecting surfaces from water rings and spills. The soft, fuzzy texture also makes it a fun and snuggly companion for any Nintendo fan. Whether you're a retro gamer or just love a good crochet project, this Mario coaster is a must-have for any Mario enthusiast.
Materials Needed:
- Red, blue, yellow, brown, black, white, and skin-tone yarn (worsted weight)
- 4.0 mm (G) crochet hook
- Yarn needle
- Scissors
Abbreviations:
- ch: chain
- sl st: slip stitch
- sc: single crochet
- hdc: half double crochet
- dc: double crochet
- inc: increase
Base Coaster:
- Round 1:
- Using teal yarn, make a magic ring.
- 6 sc in ring. Pull tight to close.
- Join with sl st to first sc. (6 sc)
- Round 2:
- ch 1, inc in each sc around.
- Join with sl st to first sc. (12 sc)
- Round 3:
- ch 1, (sc, inc) around.
- Join with sl st to first sc. (18 sc)
- Round 4:
- ch 1, (2 sc, inc) around.
- Join with sl st to first sc. (24 sc)
- Round 5:
- ch 1, (3 sc, inc) around.
- Join with sl st to first sc. (30 sc)
- Round 6:
- ch 1, (4 sc, inc) around.
- Join with sl st to first sc. (36 sc)
- Round 7:
- ch 1, (5 sc, inc) around.
- Join with sl st to first sc. (42 sc)
- Round 8:
- ch 1, (6 sc, inc) around.
- Join with sl st to first sc. (48 sc)
Mario Design:
- Using the image as a reference, you will change colors to create Mario’s image within the rounds of the base coaster.
- Each square of the pixel art corresponds to one single crochet.
- Start by following the pattern for Mario’s design using color changes:
- Red for the hat and shirt.
- Blue for the overalls.
- Yellow for the buttons.
- Brown for the shoes and hair.
- Black for the mustache, eyes, and outline.
- White for the gloves and eyes.
- Skin-tone for the face.
Color Change Tips:
- When changing colors, complete the last pull through of the stitch with the new color.
- Carry the unused yarn behind the work to avoid too many ends to weave in.
Finishing:
- Once the design is complete, fasten off and weave in any loose ends with a yarn needle.
- Block the coaster if necessary to ensure it lies flat.
No comments
Write a comment