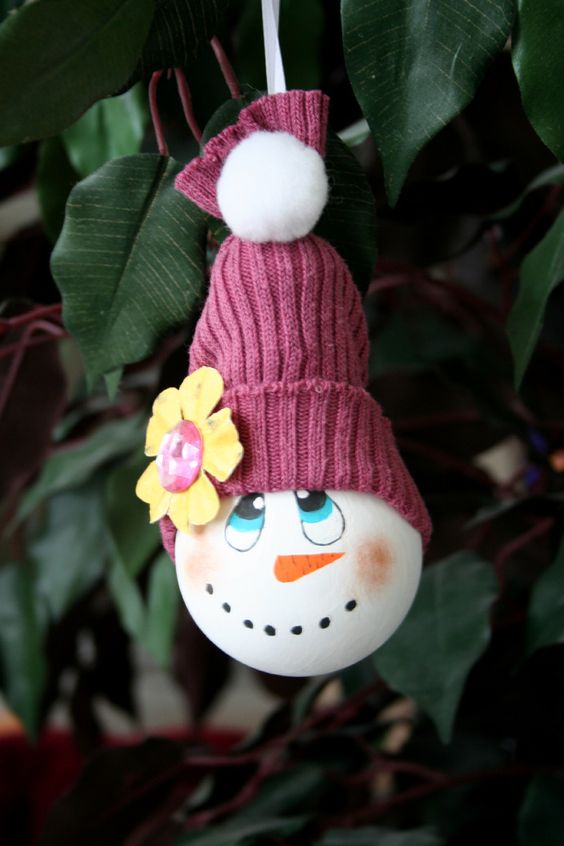
How to make a snowman ornament from a recycled light bulb
Creating a snowman ornament from a recycled light bulb is not only a fun crafting project but also a fantastic way to repurpose items and contribute to a greener planet! With a bit of creativity and some basic crafting supplies, you can transform an old light bulb into a charming snowman decoration that will bring a festive touch to your home. Add some paint, buttons, and a bit of imagination to give your snowman its own unique personality. It's a wonderful way to get into the holiday spirit while also being environmentally conscious. So gather your materials, put on some holiday music, and enjoy crafting your very own snowman ornament from a recycled light bulb!
Materials
- Standard burnt out light bulb
- White acrylic paint
- Black acrylic paint
- Orange acrylic paint
- Teal blue acrylic paint
- White ribbon (10")
- Powder blush
- Paper flower
- Gem or half pearl for center of flower
- White medium pom pom
- Woman's sock (any color)
- Pencil
- Thread (color of sock)
- Hot glue sticks
- Black permanent thin marker
- Rubbing alcohol
Tools
- Medium flat brush
- Hot glue gun
- Needle
- Scissors
1. First of all you will want to wash each light bulb and dry then with a paper towel add some rubbing alcohol and let dry. This will help the paint to adhere to the light bulb more easily.
2. Paint the entire light bulb using the flat brush and white paint. Let dry.
3. Cut the top portion of the sock and discard the rest, unless of course you want to make some of my adorable snowman sock ornaments with the bottom portion. I will do another lens with those instructions so stay tuned.
4. When the light bulb is dry using the pencil lightly draw in the eyes which are teardrop shape or you can make them round if you like. The teardrop shape gives him such a cute character. Also draw in where you want the dots for the mouth. Then draw the nose too.
5. Paint in the black portion of the eyes with the thin smaller brush as well as the teal color in the eyes. Then drop in the black dots for the mouth. With the orange paint paint in the carrot nose. Then when all these are dry take the thin brush and white paint and place dots on the black portion of the eyes, see the photo for placement. Then take the black permanent marker and outline the whole eye, keep looking at the photo for reference.
6. With the thin brush and tap into the powdered blush and pat each cheek lightly to give him color.
7. Now fold the white ribbon in half. Then take some glue and place around the backside of the top of the light bulb, glue the ribbon together in place. Be very careful because the glue is hot. This is where I usually take over because hot glue guns and kids do not mix. So I help them out with this part.
8. On the sock fold the bottom part up to make it look like a cap leaving the "cut portion" of the sock at the top. Place the sock over the top of the light bulb pulling up the white ribbon loop for hanging. Then place glue on the backside and sides of the light bulb and place the sock over those areas in place, see the photo for placement.
9. Take the needle and thread and stitch the top of the sock by gathering it together and sewing it, or if you want, you can glue it together just place a little hot glue in the center and squeeze together the top part making sure the loop is still accessible.
10. Glue the pom pom to the front section, then take the paper flower and glue onto the side, then take the gem or pearl and glue that in the center of the flower. That's it! This project is recommended for ages 10 and up, so my grandson and I did this one and my other two grand children did some easier projects. Enjoy!