Christmas Tree Light Bulb Ornament
Ah, the Christmas Tree Light Bulb Ornament is a cheerful addition to any holiday decor! These colorful little bulbs bring a nostalgic touch to the tree, reminiscing on the classic look of Christmas past. Whether you prefer the traditional red and green combination or opt for a more whimsical color scheme, these ornaments add a warm and inviting glow to your tree. As you hang each bulb with care, it's like adding a sprinkle of magic to your holiday celebrations. With their twinkling lights reflecting the joy of the season, these ornaments are sure to brighten up your home and bring a smile to everyone's face. It's amazing how such a small decoration can hold so much sentimental value and festive spirit.
Supplies
- light bulb
- paint
- toothbrush
- paintbrush
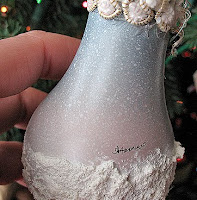
I sprayed the bulb with a mauve first. Most of it won’t show in the finished product, but it’s still an important factor. After that was dry, I sprayed the top half with a dusty country blue, putting a thicker layer toward the top and just a dusting near the middle. The idea was to blend the blue into the mauve.
Note: You have to be careful with spray paint as it will run if you have a heavy trigger finger. Better to err on the side of caution and use several light sprays, letting them dry in between.
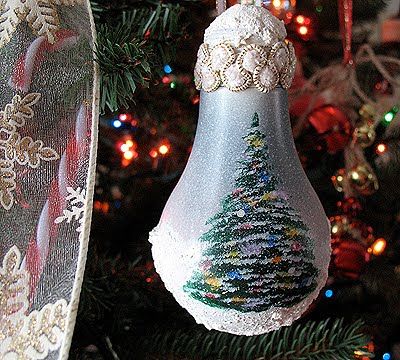
Next I painted the Christmas tree. That seems to be the “wow” factor of this ornament, and people comment on what talent I have, but really, the trees are very, very simple. Just check out the video demonstration above.
After adding the tree, and then the snow on the branches, I used a small paint brush and dabbed off all the excess paint, then gently dabbed on the “lights”. They blend into the snow and look like they are really glowing. :)
To add the “falling snow” I splattered it with watered down white paint using a tooth brush.
I glued some rick rack around the neck of the bulb, gluing a loop of ribbon underneath the rick rack.
Lastly, I used Sno-Tex snow paint to cover the top of the bulb and to coat the bottom of the bulb as well.
And of course, the finishing touch was 2-3 coats of clear acrylic sealer (I used matte, not gloss).
Instructions
- I usually prepare my light bulbs by making sure they are free of dust, rinsing in water, wiping off, then giving them a rinse in white vinegar. Usually I paint them with a brush, but this particular one I used spray cans. The reason I did that was to the create a sunset effect that would be more difficult with a brush (not impossible, just more difficult).
- I sprayed the bulb with a mauve first. Most of it won’t show in the finished product, but it’s still an important factor. After that was dry, I sprayed the top half with a dusty country blue, putting a thicker layer toward the top and just a dusting near the middle. The idea was to blend the blue into the mauve.
- Next I painted the Christmas tree. That seems to be the “wow” factor of this ornament, and people comment on what talent I have, but really, the trees are very, very simple. Just check out the video demonstration above.
- After adding the tree, and then the snow on the branches, I used a small paint brush and dabbed off all the excess paint, then gently dabbed on the “lights”.
- To add the “falling snow” I splattered it with watered down white paint using a tooth brush.
- I glued some rick rack around the neck of the bulb, gluing a loop of ribbon underneath the rick rack.
- Lastly, I used Sno-Tex snow paint to cover the top of the bulb and to coat the bottom of the bulb as well.
- And of course, the finishing touch was 2-3 coats of clear acrylic sealer (I used matte, not gloss).