Crochet Adorable Cat
Crocheting an adorable cat can be such a delightful and rewarding experience! From choosing the softest yarn to stitching each little detail with care, the process is full of joy and creativity. As you work on each part of the cat, from the tiny ears to the whiskers, you can imagine the charm it will bring once finished. Whether you're a seasoned crocheter or just starting out, making an adorable cat is a project that is sure to bring a smile to your face. So grab your crochet hook and let's create a sweet feline friend together!
Craft Supplies:
- Crochet hook size G
- 5oz White Worsted weight yarn *
- Small amount pink worsted weight yarn
- Small amount Bernat Happy Holidays Christmas Silver Red or Green yarn
- Yarn needle
- 3" Styrofoam ball
- Black button thread
- 1/4" Pink pompom
- Two 20mm oval wiggle eyes
- Tacky glue
*Feel free to substitute the white yarn with any other color of your choice.
Abbreviations:
- ch = chain
- sc = single crochet
- dc = double crochet
- slst = slip stitch
- sk = skip
- rem = remaining
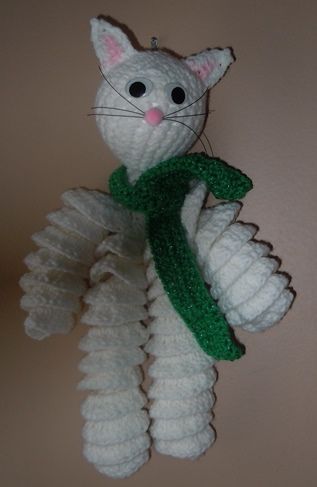
Legs (make 2):
- With white (or color of your choice) chain 37; turn
- Row 1: 2 dc in 3rd ch from hook, 3 dc in rem ch; ch 2 turn
- Row 2: 2 dc in 1st dc, 3 dc in next dc, 2 dc in next 2 dc, *3 dc in next 2 dc, 2 dc in next 2 dc; repeat from * to end of row; fasten off and weave loose ends back into your work.
Arms (make 2):
- With white chain 25; and follow instructions for rows 1 and 2 of legs.
Scarf:
- With silver red or green chain 68
- Dc in 2nd ch from hook and in each ch across. Ch 1 turn
- Dc in each dc.
- Fasten off and weave loose ends in.
Head:
- With white yarn, chain 4, join to form a ring; work 10 sc in ring
- Round 2: *1 sc in next sc, 2sc in next sc; repeat from * around (15)
- Round 3: *1 sc in each of next 3 sc, 2sc in next sc; repeat from * around (18)
- Round 4: *1 sc in each of next 4 sc, 2sc in next sc; repeat from * around (21)
- Round 5: *1 sc in each of next 5 sc, 2sc in next sc; repeat from * around (24)
- Round 6 through 13: work even
- Round 14: *sk 1, 1 sc in each of next 5 sc; repeat from * around. Insert Styrofoam ball before finishing.
- Round 15: *sk 1, 1 sc in each of next 4 sc; repeat from * around.
- Round 16: *sk 1, 1 sc in each of next 3 sc; repeat from * around.
- Decrease to close
- Fasten off and weave loose ends back into your work.
Ears (make 2):
- With white Ch 6, turn
- Sc in 2nd ch from hook and each of next 2 ch; change to pink, ch 1, turn
- Sc in each sc, change back to white, ch 1, turn
- Sc in each sc and in next ch from the original ch then slst in next ch.
- Fasten off and weave loose ends back into your work.
Finish:
- Sew arms and legs together with yarn needle and a matching piece of yarn.* Make sure the legs are on the inside and the arms on the outside.
- Stitch the arm/leg assembly to the bottom of the head.
- Stitch one ear on either side of the top of the head as pictured. Only stitch the bottom portion of the ear.
- Tie the scarf around the cat's neck.
- To make the whiskers, cut three 5" strands of black button thread. Holding the three of them as one, tie a knot in the center of the thread. Glue the knot to the center of the cat's face and glue a pink pompom on top of the knot. Glue on the two oval wiggle eyes slightly above the nose and whiskers. Trim the whiskers to the desired length.
- Work a chain of desired length (about 8 stitches long) to form a loop and attach it to the back of the head to hang him on the wall.
*I have found the easiest way to join the arms and legs together is to line up the top of the arms and legs altogether and whip stitch the top 1 1/2" or so with a yarn needle and matching yarn. Be sure to put the two legs between the arms.